This is a first part of the Ruuvi Firmware series which details how to build a sensor beacon software on RuuviTag with Segger Embedded Studio.
Final code of this blog can be downloaded at Ruuvi GitHub in ruuviblog-branch, tag 3.1.1-alpha.1. You can compile the code with Segger Embedded Studio after running
git clone https://github.com/ruuvi/ruuvi.firmware.c
cd ruuvi.firmware.c
git checkout 3.1.1-alpha.1
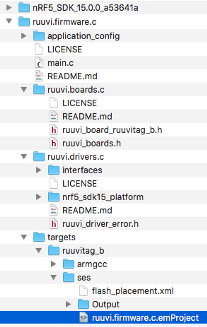
git submodule update --init --recursiveBe sure to have Nordic Semiconductor nRF15 SDK installed alongside the repository. Follow these instructions on how to install Segger Embedded Studio. After cloned the repository, you’ll find the project fileinside targets/ruuvitag_b/ses
Note: If you’re running the examples on the RuuviTag, you might need to erase the tag completely to remove the bootloader which ships with the RuuviTag. You can find current factory firmware for restoring the original Firmware on Ruuvi GitHub.
First things first
Usually when someone receives a new device to develop an application on the first step is to blink an LED. After all, it is said that if you can make it blink an LED, you can make it do anything.
However, we’ll be taking a different approach here. Since we’re running a battery powered device, we’ll be establishing a baseline on how low power consumption we can achieve. This is done by entering into low-power state and staying in there until something wakes the device up. In this case we’ll hang in the low-power state forever since there is no other functionality in our program yet.
One of the hardest thing in computer science is naming things, we’ll be calling our enter-low-power-state function yield instead of sleep. This is to signal that there is no definite time when the execution of program will continue, the program flow will be waiting until an event occurs. In multithreaded environment we’d execute other tasks in the meanwhile, but as our environment is single-threaded, we’ll just wait until something has happened before continuing the execution.
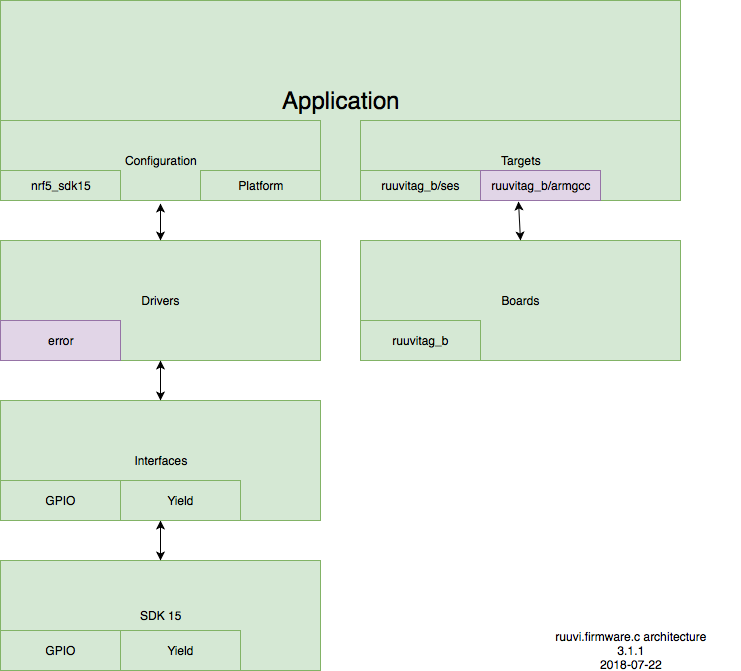
Let us take a look into our upcoming architecture:
Application
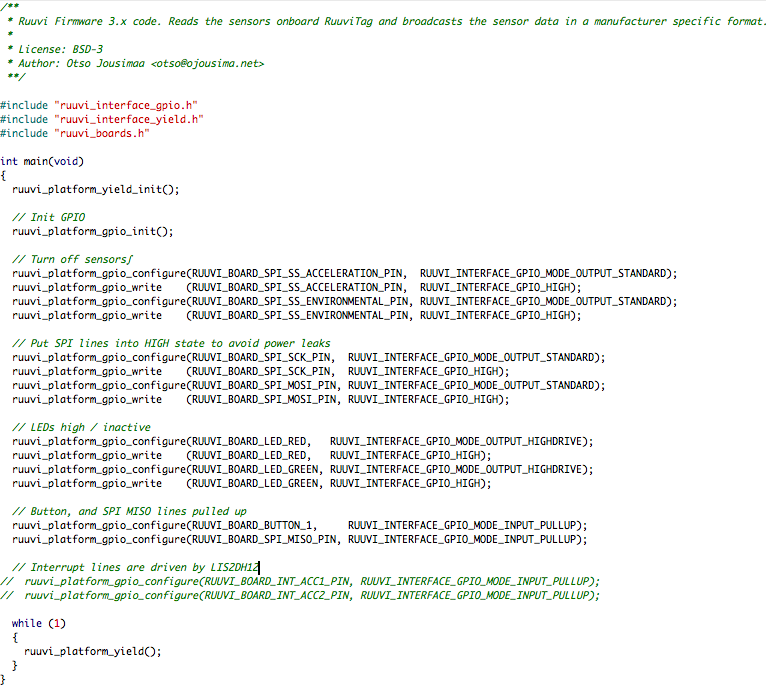
At this point our application is extremely simple. We’ll need to shutdown the external sensors and pull GPIO lines into well-defined states and then enter sleep.
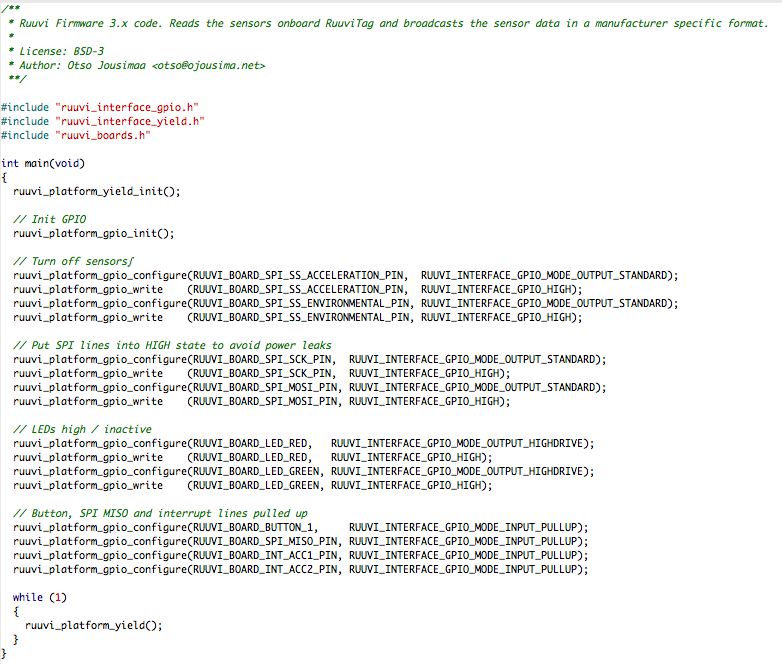
To make our application, we’ll need a few things. We’ll need board definitions to contain the pinout. Once we have the pinouts defined, we’ll need a GPIO driver to control them. Finally, we’ll need to have the yield function which will go to sleep until next event occurs. Program flow has nothing special. We run init functions and setup the GPIO, and then we’ll sleep in the while(1) loop.
Boards
We’ll start by defining the board pinout. To avoid tying our application into RuuviTag_B from the very start, we’ll take inspiration from Nordic SDK and create a header ruuvi_boards.h
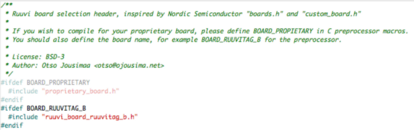
First thing to catch our eye is that we do not #include any headers, the definition must be passed directly to the compiler as a flag. This is because we don’t want to be forced to keep track of the available targets in our application code, but we’ll rather define the BOARD_RUUVITAG_B in our target scripts.
This also gives you the flexibility of maintaining your own boards repository proprietary.boards.c and maintaining your board definitions there. Just pass BOARD_PROPRIETARY and BOARD_NAME to the compiler in your target script and implement your board list in proprietary_boards.h. We’ll take a closer look to this in the targets section.

As the header suggests, we take yet more inspiration from the Nordic Semiconductor SDK. Using PCA10040 also known as nRF52-DK as the base, we’ll rip out everything which is not necessary yet and rename the pin definitions to RUUVI_BOARD_PIN.
Yield
Yield interface
Let us define the yield functions. We’ll need the initialization and yield itself, and let us add delay functions while we’re at it. The functions will return status codes, but we’ll gloss over the status codes for now and return to them in the next part of the series.
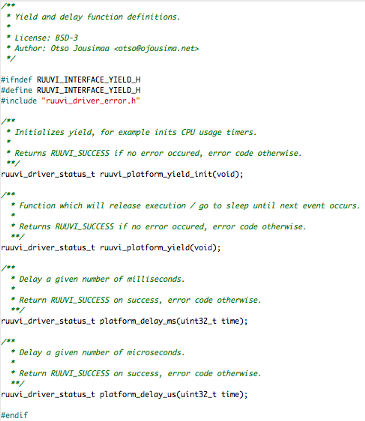
Nothing special here. We won’t be passing any parameters to yield functions, as these parameters would probably be implementation-specific and therefore would murky up the application with the implementation details.
Yield implementation
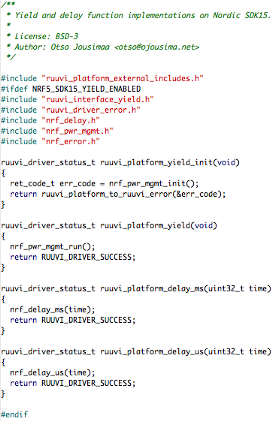
Implementing the functions is simple: We’ll pass the calls to Nordic SDK and let it take care of the rest. Any status codes returned from the SDK are converted into Ruuvi status codes, we’ll look into those in the next part of the blog series.
As a sanity check we’ll check for definition NRF5_SDK15_YIELD_ENABLED. If these functions are to be compiled into our program, it has to evaluate to non-false. Our driver has no way knowing if the application wants to use these specific implementations, so we’ll add one include ruuvi_platform_external_includes.h which will include the configuration from the application. We could use preprocessor C-flags like we did with the ruuvi_boards.h, however we can expect there to be a lot of configuration options as the project progresses. Having explicit includes allows us to leave a comment on meaning of each flag and option as well as valid values for the options.
GPIO
GPIO interface
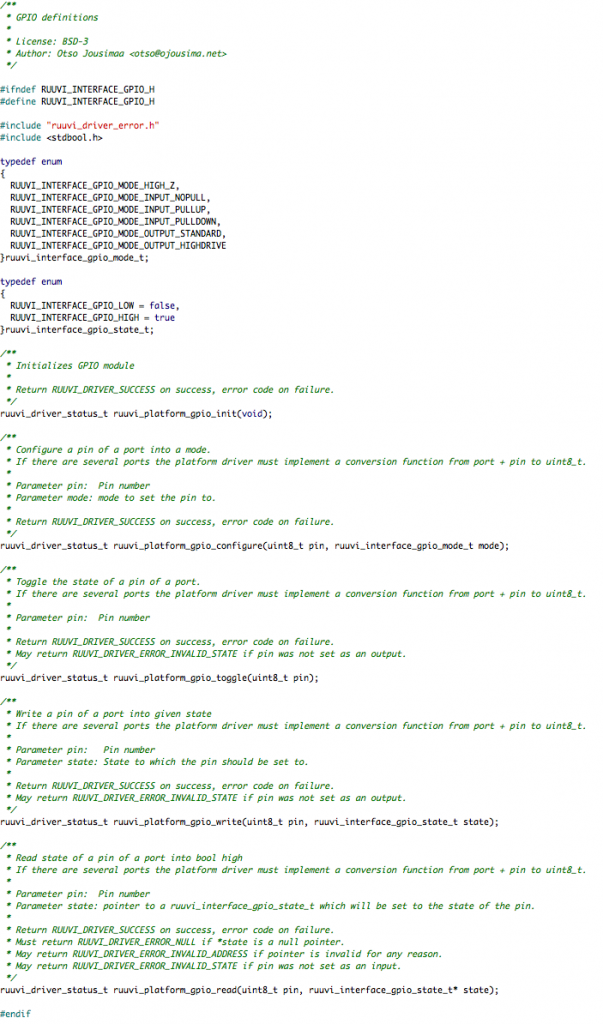
Our GPIO definitions are plain and simple at this point. We have the high-impedance mode, input without pull resistors, input with pull-up or pull down, standard output for IO and high-drive output for driving LEDs.
The functions are likewise plain init, configure, toggle, write, and read. It should be noted that the read function takes ruuvi_interface_state_t pointer as an input, pointer value will be set to the state of the pin. This allows us to return the status code from the read function.
GPIO implementation
The start of the GPIO implementation is similar to yield implementation. We’ll check if the NRF15_SDK15_GPIO_ENABLED is non-false before compiling the program. As with yield, we’ll pass the function calls to nRF5 SDK15 and return status codes from the function.
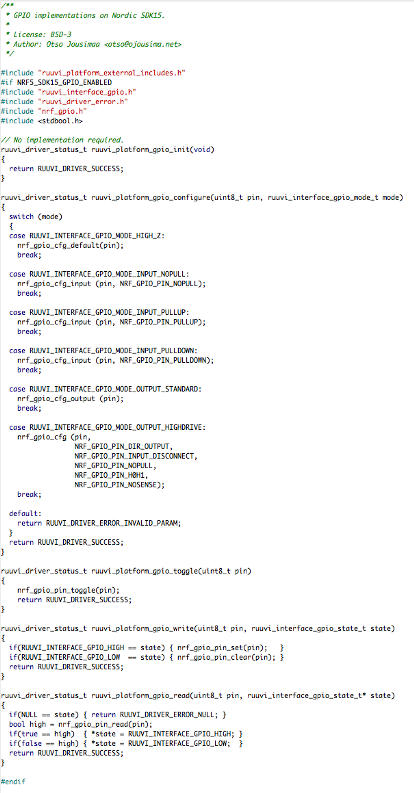
There are some style choices which might raise eyebrows, so let me address them here. First one is return values; it is a good practise to have only one possible point at a function where a value can be returned. Reasoning for having multiple possible return points is the meaning of return value: we’re not returning a result of calculation, but a status code. The return values are being treated as exceptions being thrown rather than something the program should accept and process further.
Second one is the if-else structures. A lot of the readers would write function ruuvi_platform_gpio_read as
ruuvi_driver_status_t ruuvi_platform_gpio_read(uint8_t pin, ruuvi_interface_gpio_state_t* state)
{
  if(state == NULL)
  {
    return RUUVI_DRIVER_ERROR_NULL;
  }  bool high = nrf_gpio_pin_read(pin);
  if(high)
  {
    *state = RUUVI_INTERFACE_GPIO_HIGH;
  }
  else
  {
    *state = RUUVI_INTERFACE_GPIO_LOW;
  }
  return RUUVI_DRIVER_SUCCESS;
}
First, my habit of placing the constant on the left side of comparison stems from that one time where I accidentally wrote assignment instead of comparison and hilarity ensued. I’m also aware that compiler should give a warning if there is an assignment inside if-clause and warnings should be treated as errors. Regrettably that does not hold true across all languages I’m working with.
Second, checking if boolean value is true rather than just using the boolean value as-is. This is another matter of habit as well as somewhat Pythonic thinking: explicit is better than implicit.
Third: Using two mutually exclusive if-clauses rather than if-else. This is related to my way of thinking: I want to set state to LOW if state was LOW. whatever logic happened before the state is set LOW is irrelevant here. The line
if(false == high) { *state = RUUVI_INTERFACE_GPIO_LOW; }is self-contained, we don’t have to know anything else to examine it. If we write
else
{
  *state = RUUVI_INTERFACE_GPIO_LOW;
}
we don’t really know what happens here. We’ll need to check on the previous context to understand which logic condition enters this clause. Of course argument could be made that same holds true for the first clause if the following clauses can be entered. Maybe the entire function should be
ruuvi_driver_status_t ruuvi_platform_gpio_read(uint8_t pin, ruuvi_interface_gpio_state_t* state)
{
  if(state == NULL){ return RUUVI_DRIVER_ERROR_NULL; }  bool high = nrf_gpio_pin_read(pin);
  if(true == high)
  {
    *state = RUUVI_INTERFACE_GPIO_HIGH;
    return RUUVI_DRIVER_SUCCESS;
  }
  if(false == high)
  {
    *state = RUUVI_INTERFACE_GPIO_LOW;
    return RUUVI_DRIVER_SUCCESS;
  }
  return RUUVI_DRIVER_ERROR_INTERNAL;
}
I consider that to be a matter of preference, if nothing went wrong the function was executed successfully. Someone else might prefer to structure the code as “if function did not return successfully, error occured”.
Configuration
To actually compile the code, we’ll need to add sdk_configuration.h template to our nrf5_sdk15_platform. We’ll use the configuration from Nordic’s ble_app_buttonless_dfu as a base. To allow application specific overrides we’ll include the ruuvi_platform_external_includes.h in sdk_config.h.
Next we’ll make the ruuvi_platform_external_includes.h and include headers to configure our platform code as well as Nordic SDK.
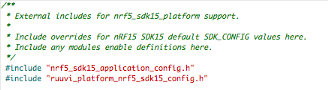
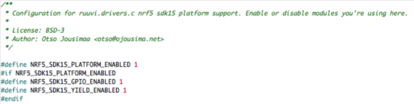
At this point we don’t need any non-default configuration for the SDK, but we’ll need to enable the GPIO and yield functions in ruuvi_platform_nrf5_sdk15_config.h. Additionally we’ll define NRF5_SDK15_PLATFORM_ENABLED.
Target
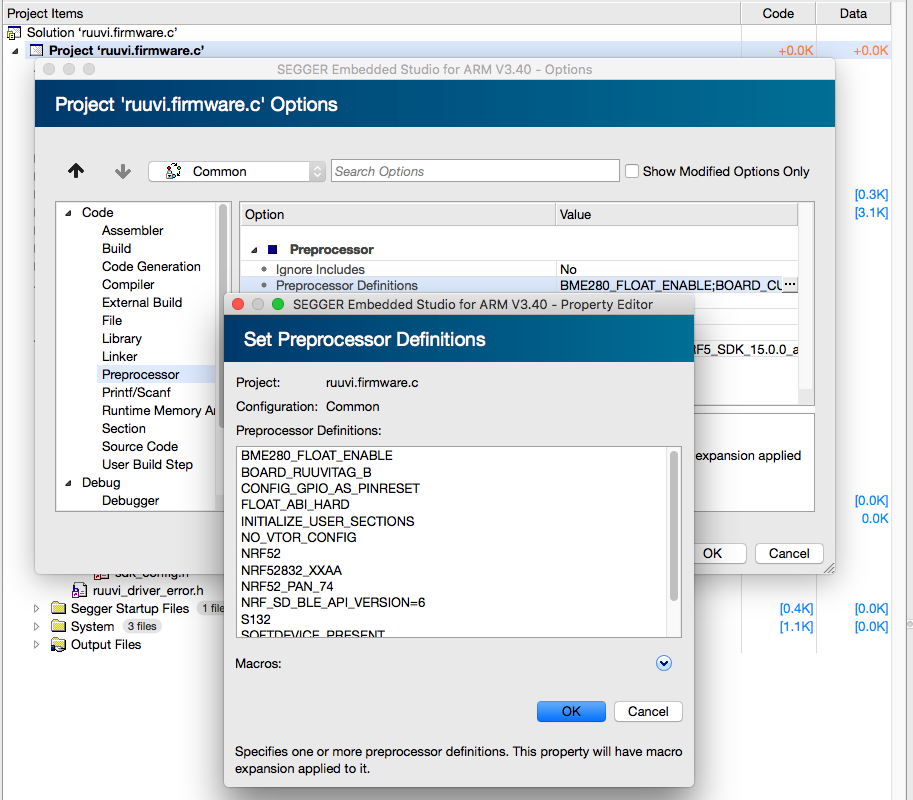
Setting up the SEGGER Embedded Studio (SES) to compile the project is a project worth of it’s own tutorial, so we won’t go into details here. In short, the SES project of the Nordic SDK 15 ble_app_buttonless_dfu has been taken as a base, and project files have been added. We’ll also need to add the BOARD_RUUVITAG_B definition for the preprocessor.
Flashing
It’s time to flash our new firmware into the board and see how it performs! Note that SES does not erase the entire tag when you flash, so you might still have a bootloader on tag. Run “Erase all” under SES connect menu to have a clean install.
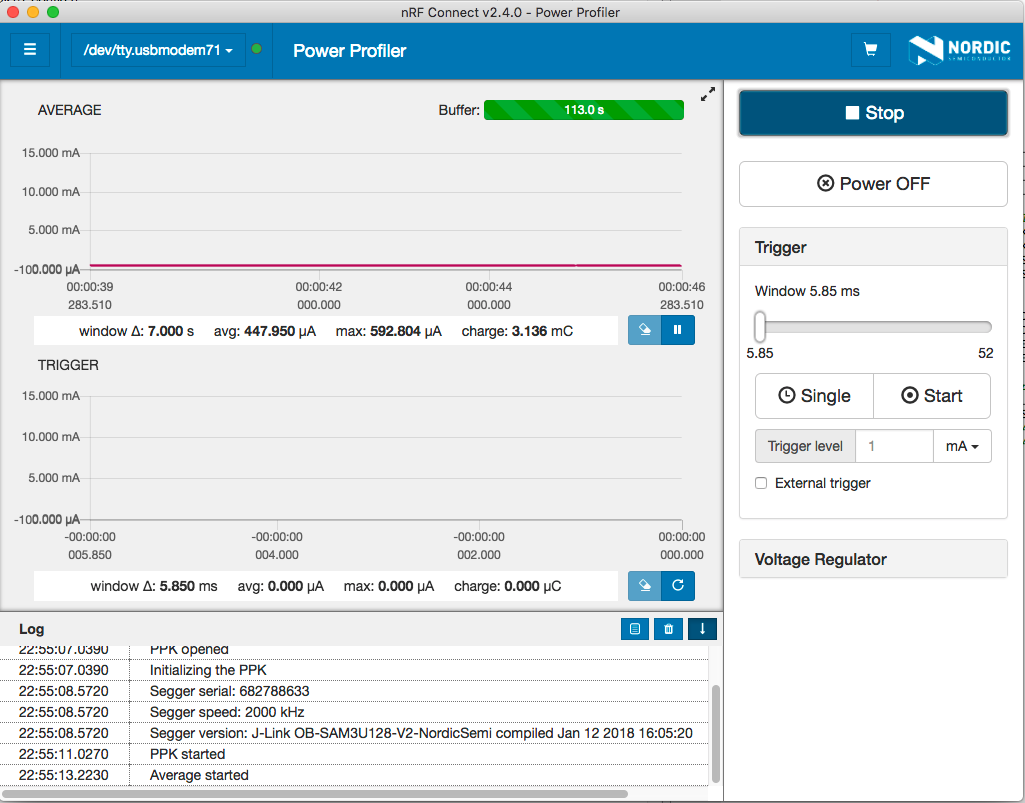
Well, that’s not so good. Ruuvi Firmware 1.2.12 which actually does useful things consumes less than 25 uA on average, so we’re about 18 times over the benchmark here before even doing anything. Out of a hunch, let us leave the interrupt lines in high-z mode.
How do we do this time?
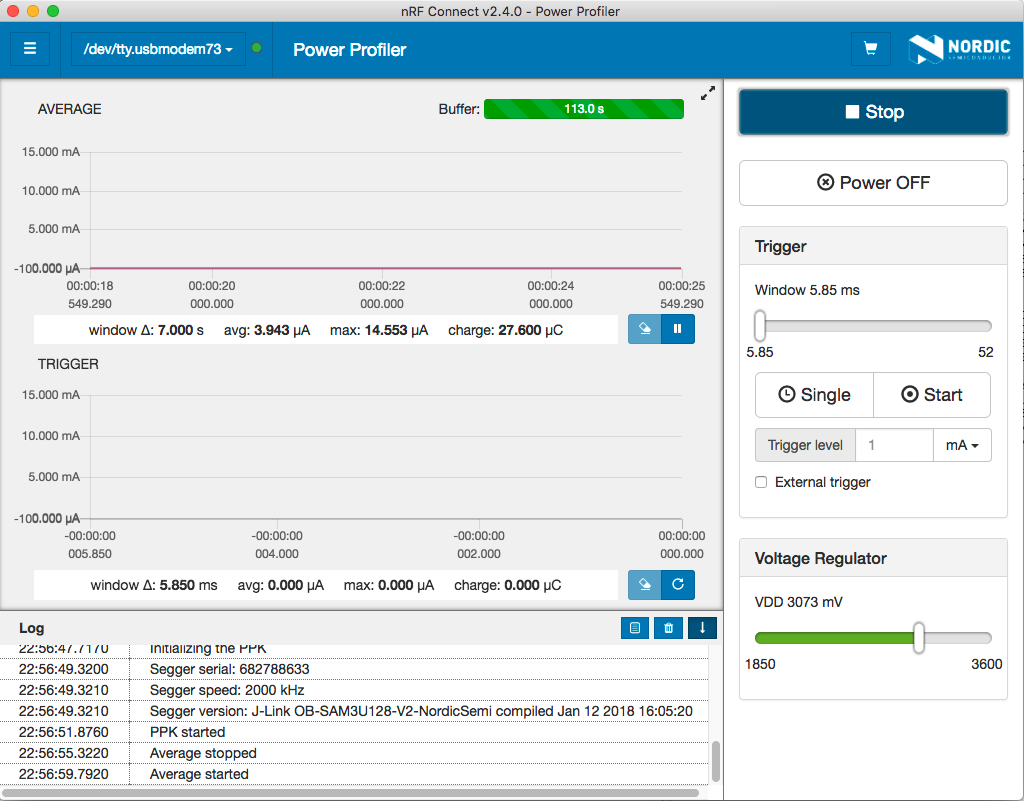
After removing the pull-ups we’re at 4 uA consumption. Earlier on while power profiling FW on 1.x branch we concluded that our baseline was 8 uA, which means that we’re at half of previous level. So far, so good!
Conclusion
Right now we’re roughly at the point where we were back in the beginning of 2016 functionality-wise: we can compile and flash software to RuuviTag and verify that we can reach very low power consumption in sleep mode. We have a base structure upon which we can build on.