In this part of the tutorial we’ll add Near-Field Communication (NFC) read functionality to the tag, i.e RuuviTag is going to be read-only NFC tag in the end of this post. Final code of this blog post can be downloaded at Ruuvi GitHub in the ruuviblog-branch, tag 3.10.0-alpha.
Please follow part 1 of the series for details on how to clone the repository and compile the code. Final hex of this tutorial can be downloaded from the Ruuvi Jenkins.
NFC
NFC interface
As in the previous post, we’re not going to implement everything in one go. In the Bluetooth Low-Energy (BLE) advertising we implemented only sending advertisements and scanning was left to the future, likewise we’re leaving NFC writes to the tag unimplemented for now.
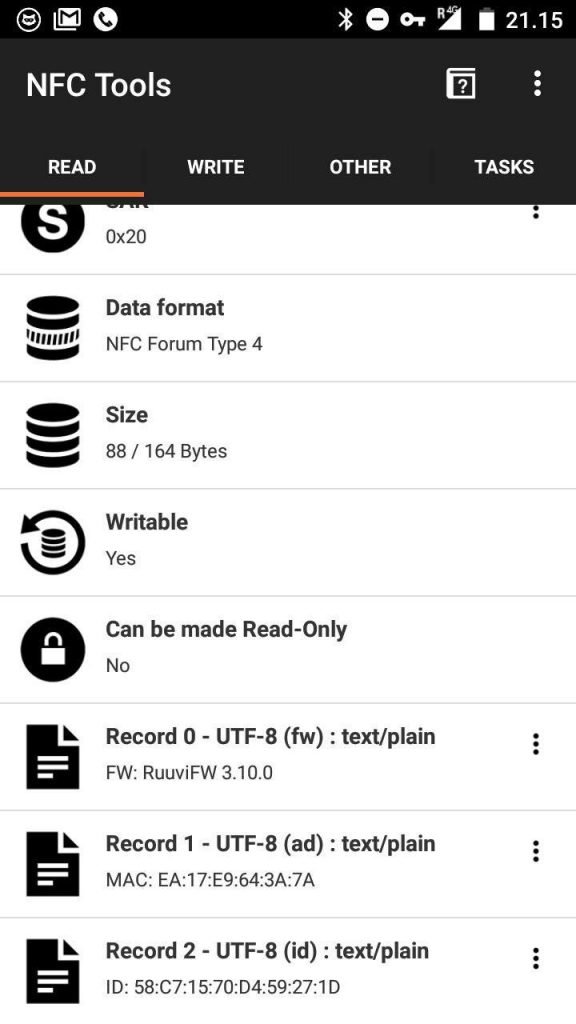
We’re aiming to replicate the functionality in Ruuvi FW 1.2.12, which prints out the firmware version, Media Access Control (MAC) address and unique ID of the tag. As our communication interface does not have a concept of “slots”, such as ndef-records we’ll add the text records as NFC-specific functions and send as a NFC binary record.
/*
 * Initializes NFC hardware
 *
 * Returns RUUVI_DIRVER_SUCCESS on success, RUUVI_DIRVER_ERROR_INVALID_STATE if radio is already initialized
 */
ruuvi_driver_status_t ruuvi_interface_communication_nfc_init(ruuvi_interface_communication_t* const channel);

/*
 * Uninitializes NFC hardware
 *
 * Returns RUUVI_DIRVER_SUCCESS on success or if radio was not initialized.
 * Returns RUUVI_DRIVER_ERROR_INVALID_STATE if radio hardware was initialized by another radio module.
 */
ruuvi_driver_status_t ruuvi_interface_communication_nfc_uninit(ruuvi_interface_communication_t* const channel);

// Encodes the given data fields into NFC buffer. Clears previous data.
ruuvi_driver_status_t ruuvi_interface_communication_nfc_data_set(void);

/**
 * Send data as ascii-encoded binary.
 *
 * Returns RUUVI_DRIVER_SUCCESS if the data was placed in buffer
 * Returns error code from the stack if data could not be placed to the buffer
 */
ruuvi_driver_status_t ruuvi_interface_communication_nfc_send(ruuvi_interface_communication_message_t* messge);

/**
 * Sets the device firmware version into "FW" text field.
 *
 *  parameter version: Pointer on string representation of the version. ie. "FW: ruuvi.firmware.c 3.10.0"
 *
 * returns RUUVI_DRIVER_SUCCESS on success
 * returns RUUVI_DRIVER_ERROR_NULL if version is NULL and length != 0
 * returns RUUVI_DRIVER_INVALID_LENGTH if name is over 32 bytes long
 */
ruuvi_driver_status_t ruuvi_interface_communication_nfc_fw_version_set(const uint8_t* const version, const uint8_t length);

/**
 * Sets the device mac address into "ad" text field.
 *
 * returns RUUVI_DRIVER_SUCCESS on success
 * returns RUUVI_DRIVER_ERROR_NULL if address is NULL and length != 0
 * returns RUUVI_DRIVER_INVALID_LENGTH if name is over 32 bytes long
 */
ruuvi_driver_status_t ruuvi_interface_communication_nfc_address_set(const uint8_t* const address, const uint8_t length);

/**
 * Sets the device id into "id" text field. Set NULL/0 to disable
 *
 *  parameter id: Pointer on string representation of the id. ie. "ID: 12:34:56:78:90:AB:CD:EF
 *
 * returns RUUVI_DRIVER_SUCCESS on success
 * returns RUUVI_DRIVER_ERROR_NULL if id is NULL and length != 0
 * returns RUUVI_DRIVER_INVALID_LENGTH if name is over 32 bytes long
 */
ruuvi_driver_status_t ruuvi_interface_communication_nfc_id_set(const uint8_t* const id, const uint8_t length);

// Not implemented
ruuvi_driver_status_t ruuvi_interface_communication_nfc_receive(ruuvi_interface_communication_message_t* messge);NFC Driver
The Nordic NFC driver sets up a buffer in RAM, and when the NFC field is detected, this buffer is transmitted over NFC to the reader — or it is modified to new value by the writer.
Therefore we need double buffering: first we setup what we want to send in records and then those records are encoded into the NFC buffer. If the NFC field is currently on, we won’t change the buffer.
The driver itself is simple wrappers around the Software Development Kit (SDK) functions and handling of the data buffers. There’s one gotcha: We need to add HAL_NFC_ENGINEERING_BC_FTPAN_WORKAROUND to our compiler flags so the NFC driver will release the High-Frequency Clock (HFCLK) after the NFC connection is broken.
Integrating to Application
Integration goes as usual: we write task_nfc and call the initialization in main.c. The initialization sets up the records and we’re ready.
/**
 * Initializes NFC and configures FW, ADDR and ID records according to application_config.h constants
 *
 * return RUUVI_DRIVER_SUCCESS on success
 * return error code from stack on error
 */
ruuvi_driver_status_t task_nfc_init(void);

/**
 * Sets given message to NFC RAM buffer. Clears previous message
 *
 * return RUUVI_DRIVER_SUCCESS on success
 * return error code from stack on error
 */
ruuvi_driver_status_t task_nfc_send(ruuvi_interface_communication_message_t* message);We only need the initialization so far.
int main(void)
{
  // Init logging
  ruuvi_driver_status_t status = RUUVI_DRIVER_SUCCESS;
  status |= ruuvi_platform_log_init(APPLICATION_LOG_LEVEL);
  RUUVI_DRIVER_ERROR_CHECK(status, RUUVI_DRIVER_SUCCESS);

  // Init yield
  status |= ruuvi_platform_yield_init();
  RUUVI_DRIVER_ERROR_CHECK(status, RUUVI_DRIVER_SUCCESS);

  // Init GPIO
  status |= ruuvi_platform_gpio_init();
  RUUVI_DRIVER_ERROR_CHECK(status, RUUVI_DRIVER_SUCCESS);

  // Initialize LED gpio pins, turn RED led on.
  status |= task_led_init();
  status |= task_led_write(RUUVI_BOARD_LED_RED, TASK_LED_ON);
  RUUVI_DRIVER_ERROR_CHECK(status, RUUVI_DRIVER_SUCCESS);

  // Initialize SPI
  status |= task_spi_init();
  RUUVI_DRIVER_ERROR_CHECK(status, RUUVI_DRIVER_SUCCESS);

  // Initialize RTC
  status |= task_rtc_init();
  RUUVI_DRIVER_ERROR_CHECK(status, RUUVI_DRIVER_SUCCESS);

  // Initialize power
  status |= task_power_dcdc_init();
  RUUVI_DRIVER_ERROR_CHECK(status, RUUVI_DRIVER_SUCCESS);

  // Initialize nfc
  status |= task_nfc_init();
  RUUVI_DRIVER_ERROR_CHECK(status, RUUVI_DRIVER_SUCCESS);

  #if RUUVI_RUN_TESTS
  // Tests will initialize and uninitialize the sensors, run this before using them in application
  test_sensor_run();

  // Print unit test status, activate tests by building in DEBUG configuration under SES
  size_t tests_run, tests_passed;
  test_sensor_status(&tests_run, &tests_passed);
  char message[128] = {0};
  snprintf(message, sizeof(message), "Tests ran: %u, passed: %u\r\n", tests_run, tests_passed);
  ruuvi_platform_log(RUUVI_INTERFACE_LOG_INFO, message);
  #endif

  // Initialize BLE
  status |= task_advertisement_init();
  RUUVI_DRIVER_ERROR_CHECK(status, RUUVI_DRIVER_SUCCESS);

  // Initialize ADC
  status |= task_adc_init();
  RUUVI_DRIVER_ERROR_CHECK(status, RUUVI_DRIVER_SUCCESS);

  // Initialize environmental- nRF52 will return ERROR NOT SUPPORTED if
  // DSP was configured, log warning
  status |= task_environmental_init();
  RUUVI_DRIVER_ERROR_CHECK(status, RUUVI_DRIVER_ERROR_NOT_SUPPORTED);

  // Allow NOT FOUND in case we're running on basic model, NOT_SUPPORTED in case we have previous error from BME280
  status |= task_acceleration_init();
  RUUVI_DRIVER_ERROR_CHECK(status, RUUVI_DRIVER_ERROR_NOT_FOUND | RUUVI_DRIVER_ERROR_NOT_SUPPORTED);

  // Initialize button with on_button task, do not reset on errors from model Basic
  status |= task_button_init(RUUVI_INTERFACE_GPIO_SLOPE_HITOLO, task_button_on_press);
  RUUVI_DRIVER_ERROR_CHECK(status, RUUVI_DRIVER_ERROR_NOT_FOUND | RUUVI_DRIVER_ERROR_NOT_SUPPORTED);

  // Turn RED led off. Turn GREEN LED on if no errors occured
  status |= task_led_write(RUUVI_BOARD_LED_RED, TASK_LED_OFF);
  if(RUUVI_DRIVER_SUCCESS == status)
  {
    status |= task_led_write(RUUVI_BOARD_LED_GREEN, TASK_LED_ON);
    ruuvi_platform_delay_ms(1000);
  }
  // Reset any previous errors, turn LEDs off, continue unless fatal error occurs
  status |= task_led_write(RUUVI_BOARD_LED_GREEN, TASK_LED_OFF);
  RUUVI_DRIVER_ERROR_CHECK(status, ~RUUVI_DRIVER_ERROR_FATAL);

  while (1)
  {
    status = ruuvi_platform_yield();
    // Reset only on fatal error
    RUUVI_DRIVER_ERROR_CHECK(status, ~RUUVI_DRIVER_ERROR_FATAL);
  }
}We have also added a power task to initialize the DC/DC onboard RuuviTag
Let’s take a look with the phone’s NFC reader:
Backlog
Power Interface
In the previous post we used excessive amount of the power because the internal Direct Current to Direct Current converter (DC/DC) regulator of the nRF52832 was not enabled. We’ll add an interface which takes a list of regulators to enable and passes the list to the platform drivers which will then enable selected regulators.
There’s other power-related functions, such as entering deep sleep and configuring the wakeups. However we won’t be implementing those yet.
#define RUUVI_INTERFACE_POWER_REGULATORS_DISABLED 0
#define RUUVI_INTERFACE_POWER_REGULATORS_DCDC_INTERNAL (1<<0)  // DC/DC for internal circuitry, i.e. nRF52832 radio
#define RUUVI_INTERFACE_POWER_REGULATORS_DCDC_HV       (1<<1)  // DC/DC for high voltage, i.e. nRF52840 USB

typedef uint32_t ruuvi_interface_power_regulators_t;

/**
 * Enable given regulators. The implementation must work regardless of software radio state, i.e.
 * on S132 on nRF52 the function must check if softdevice is running and call softdevice wrapper to
 * DC/DC if it is and write registers directly if SD is not running.
 *
 * parameter regulators: binary flags of regulators to enable.
 * return: RUUVI_DRIVER_SUCCESS on success, error code from stack in case of a error.
 */
ruuvi_driver_status_t ruuvi_interface_power_regulators_enable(const ruuvi_interface_power_regulators_t regulators);Power Driver
Power driver is simple at this point. We create the configuration and uninitialize the power driver if case it was already initialized, then we configure and initialize the driver.
static bool m_is_init = false;

ruuvi_driver_status_t ruuvi_interface_power_regulators_enable(const ruuvi_interface_power_regulators_t regulators)
{

  ret_code_t err_code = NRF_SUCCESS;
  nrfx_power_config_t config = {0};
  if(RUUVI_INTERFACE_POWER_REGULATORS_DCDC_INTERNAL & regulators)
  {
    config.dcdcen = true;
  }
  if(RUUVI_INTERFACE_POWER_REGULATORS_DCDC_HV & regulators)
  {
    #if NRF_POWER_HAS_VDDH
    config.dcdcenhv = true;
    #endif
  }
  if(m_is_init)
  {
    nrfx_power_uninit();
    m_is_init = false;
  }
  err_code |= nrfx_power_init (&config);
  m_is_init = true;
  return ruuvi_platform_to_ruuvi_error(&err_code);
}Communication Interface
While we don’t do anything with the NFC connection information yet, we might want to use NFC connection event to enter configurable mode (or something else like that). Let’s append the communication interface with events connected, disconnected, sent, received and add an event handler to the function pointer interface.
// Standard BLE Broadcast manufacturer specific data payload length
#define RUUVI_INTERFACE_COMMUNICATION_MESSAGE_MAX_LENGTH 24

typedef struct{
  uint8_t data[RUUVI_INTERFACE_COMMUNICATION_MESSAGE_MAX_LENGTH];
  uint8_t data_length;
  bool repeat;
}ruuvi_interface_communication_message_t;

typedef enum {
  RUUVI_INTERFACE_COMMUNICATION_CONNECTED,
  RUUVI_INTERFACE_COMMUNICATION_DISCONNECTED,
  RUUVI_INTERFACE_COMMUNICATION_SENT,
  RUUVI_INTERFACE_COMMUNICATION_RECEIVED,
}ruuvi_interface_communication_evt_t;

typedef struct ruuvi_interface_communication_t ruuvi_interface_communication_t;          // forward declaration *and* typedef
typedef ruuvi_driver_status_t(*ruuvi_interface_communication_xfer_fp_t)(ruuvi_interface_communication_message_t*);
typedef ruuvi_driver_status_t(*ruuvi_interface_communication_init_fp_t)(ruuvi_interface_communication_t* const);
typedef ruuvi_driver_status_t(*ruuvi_interface_communication_evt_handler_fp_t)(const ruuvi_interface_communication_evt_t);

// Every Ruuvi communication channel must  be able to send data and receive data.
// Channels can be init or uninit
struct ruuvi_interface_communication_t
{
  ruuvi_interface_communication_xfer_fp_t        send;
  ruuvi_interface_communication_xfer_fp_t        read;
  ruuvi_interface_communication_init_fp_t        init;
  ruuvi_interface_communication_init_fp_t        uninit;
  ruuvi_interface_communication_evt_handler_fp_t on_evt;
};

/**
 * Writes maximum 64-bit unique id of the device to the pointer. This ID
 * must remain same across reboots and reflashes of the device
 *
 * param id: Output, value of id.
 * return RUUVI_DRIVER_SUCCESS on success
 * return RUUVI_DRIVER_ERROR_NOT_SUPPORTED if ID cannot be returned on given platform
 *
 */
ruuvi_driver_status_t ruuvi_interface_communication_id_get(uint64_t* const id);We’re going to need these later on when we’re having a proper queuing of the messages instead of “drop whatever was being sent and start sending this”.
We also add function to return unique ID of the device into communication interface, and a function to return the mac address into radio interface.
Power Consumption
Once again, it’s time to check how the power consumption looks like. First, let us check the base level at boot.
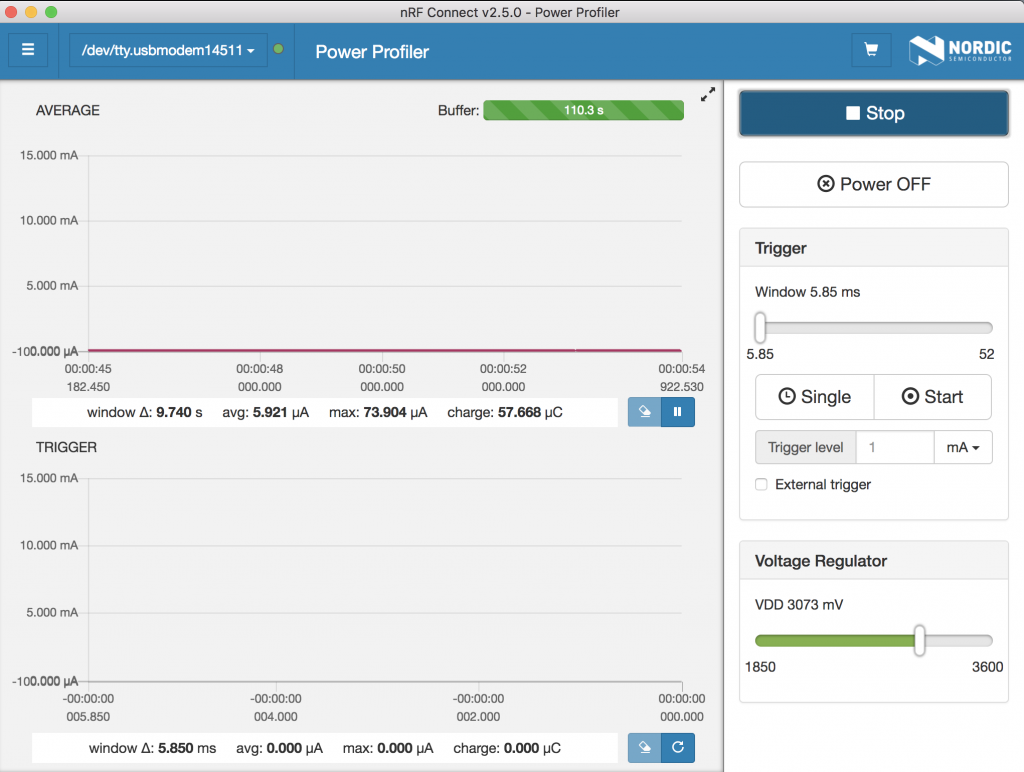
Now we’re consuming 5.9 μA at idle, 0.7 μA down from 6.6 μA in our previous post. We’re probably not actually consuming any less power than we used to, but this is rather a temperature effect or a matter of measurement repeatability.
Next let’s scan the tag and check how the consumption looks.
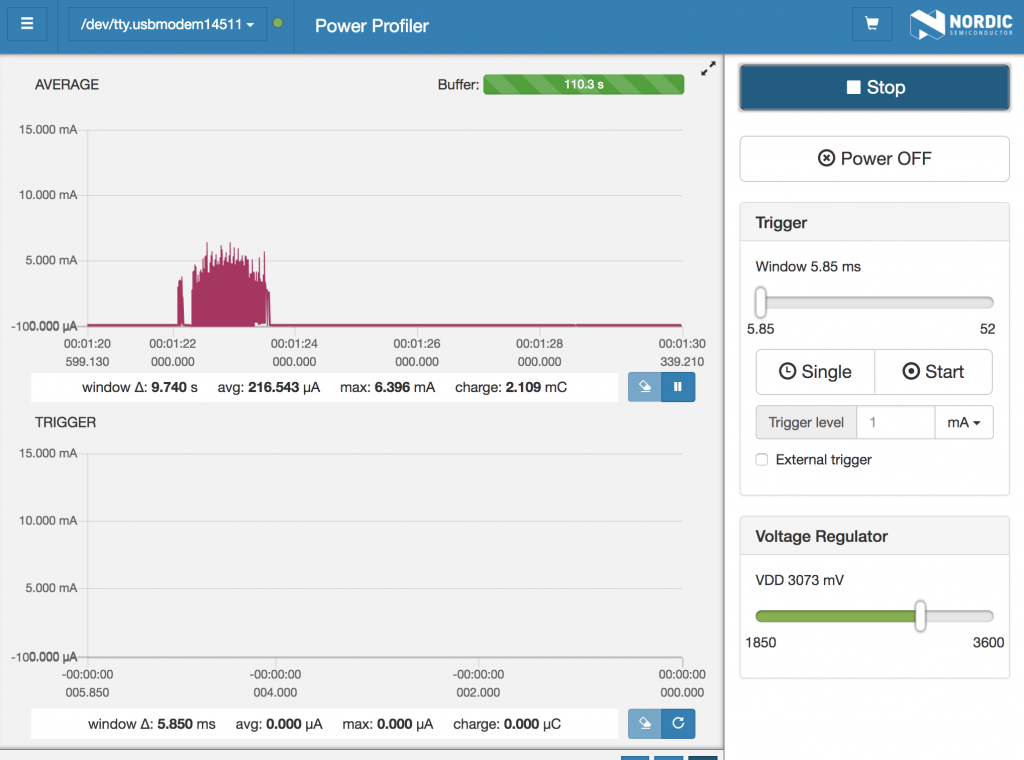
The power consumption is a lot higher during the scan, as the HFCLK is running to keep the tag operating. Important thing to check is that we’re back at the previous level after running the scan, i.e. the C-flag has activated the workaround for excess power consumption after NFC scan.
Next, let’s press “B” to start the radio and see how our power driver performs.
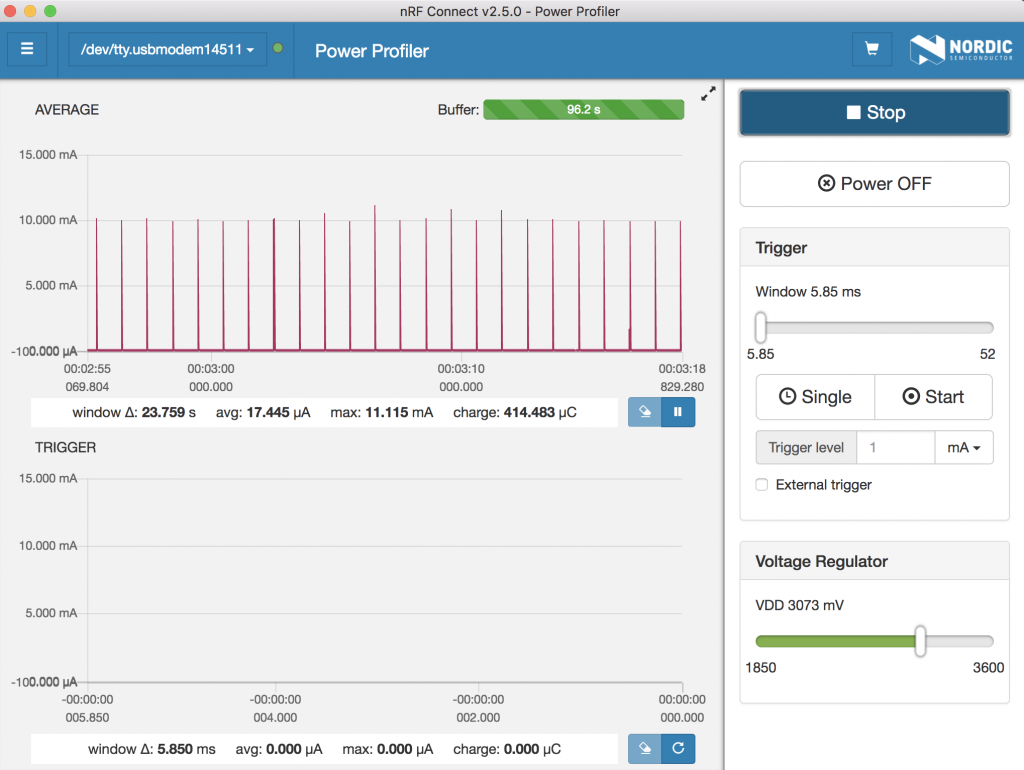
Now our average current consumption is 17.4 μA, 10 uA down from the previous post where DC/DC was not enabled. This is also very competitive with the 24 μA of current Ruuvi Firmware, maybe we’ll end up having a bit more power-efficient firmware in the end?
Conclusion
We now have almost all functionality of the original Ruuvi Firmware, however one important feature is missing: updating the measurement at a regular interval. In the next part of the series we’ll add a scheduler to update the data at a regular interval.
Stay tuned and follow @ojousima and @ruuvicom on Twitter for #FirmwareFriday posts!