

In this part of the tutorial we’ll add support for timing the tasks and scheduling tasks to be executed in the future. Final code of this blog post can be downloaded at Ruuvi GitHub in the ruuviblog-branch, tag 3.11.0-alpha.
Please follow part 1 of the series for details on how to clone the repository and compile the code. Final hex of this tutorial can be downloaded from the Ruuvi Jenkins.
Scheduler
Our program is structured around various events, such as “Do this when NFC field is detected” or “Do that when BLE transmission window is open”. Some of these tasks have really strict hard-time requirements, such as Bluetooth Low-Energy (BLE) transmissions which must hit their allocated time windows exactly.
It’s easy to see that the tasks must have some sort of co-operation. Everything cannot be run at once, and some tasks have higher priorities than others. Let us consider interaction between button and Bluetooth.
The button press signals that user wants something to happen. However the user is probably not in a hurry — they can wait for 100 milliseconds without even noticing that there is any significant delay. However, if our Bluetooth transmission window is within that 100 ms window and the Bluetooth task could not run we’d miss the window and break the Bluetooth functionality.
Interrupts with priorities are a part of the solution. Our Bluetooth functions can interrupt anything else that is going on the program. However let us say that we want to update the sensor data after previous data has been sent: if we start such a task at the highest priority level of Bluetooth interrupt, nothing else can run while we read the sensors — not even another Bluetooth transmission.
Another part of the solution is the scheduler. We reserve the interrupts for time-critical actions and short events, and schedule the longer-lasting tasks to be run at a later time with lower priority.
While there are many kinds of schedulers, we’ll once more opt for keeping things simple and use a queued run-to-completion scheduler. Tasks are executed in the order they are scheduled and every task is run to its completition — possibly interrupted by another event.
A more elegant scheduler would be co-operative scheduler which would let other tasks run while one task is waiting for something else. For example our single-shot sensor task could yield the execution to next task while the task waits for sensor to finish sampling. Practically we don’t need this kind of finesse for everyday sensor beaconing, so we use the simple model.
Scheduler Interface
Our scheduler interface has initialization, definition for task to be executed, a function to execute the schedule and a function to add a task to the schedule. We could add some analytics, such as “get maximum usage”, but as that is not needed at this point lets keep the interface short.
/**
 * Initialize scheduler.
 *
 * Allocates memory for scheduler task queue.
 *
 * parameter max_event_size: maximum size for event data
 * parameter queue_size: maximum number of scheduled tasks
 *
 * Returns RUUVI_DRIVER_SUCCESS on success, error code from stack on error
 */
ruuvi_driver_status_t ruuvi_interface_scheduler_init(size_t event_size, size_t queue_size);

/**
 * Type definition for scheduler event handler.
 *
 * parameter p_event_data: Data for the event handler
 * parameter event_size: Size of the event data. Must be smaller than or equal to max_event_size
 *
 */
typedef void(*ruuvi_scheduler_event_handler_t)(void *p_event_data, uint16_t event_size);

/**
 *  Executes all scheduled tasks. If task schedules itself to be run immediately this will be run in a never-ending loop, without sleeping.
 *
 *  Returns RUUVI_DRIVER_SUCCESS if queue was executed successfully.
 *  Returns error code from the stack if error occurs.
 */
ruuvi_driver_status_t ruuvi_platform_scheduler_execute(void);

/**
 * Schedule given task to be executed on next call to ruuvi_platform_scheduler_execute
 */
ruuvi_driver_status_t ruuvi_platform_scheduler_event_put (void const *p_event_data, uint16_t event_size, ruuvi_scheduler_event_handler_t handler);Scheduler Implementation
We’ll use the Nordic SDK scheduler implementation. As the implementation uses initializer macro which expects a constant size parameters, we’ll have to ignore any dynamically given parameter and #define fixed values for the scheduler. If the parameters given by user don’t match the fixed values we’ll give a warning to the user.
// Ignore give parameters to call the macro with #defined constants
ruuvi_driver_status_t ruuvi_interface_scheduler_init(size_t event_size, size_t queue_length)
{
  // Event size and queue length must be fixed at compile time. Warn user if other values are going to be used.
  if(event_size != NRF5_SDK15_SCHEDULER_DATA_MAX_SIZE || queue_length != NRF5_SDK15_SCHEDULER_QUEUE_MAX_LENGTH)
  { RUUVI_DRIVER_ERROR_CHECK(RUUVI_DRIVER_ERROR_INVALID_PARAM, ~~RUUVI_DRIVER_FATAL); }

  APP_SCHED_INIT(NRF5_SDK15_SCHEDULER_DATA_MAX_SIZE, NRF5_SDK15_SCHEDULER_QUEUE_MAX_LENGTH);
  return RUUVI_DRIVER_SUCCESS;
}

ruuvi_driver_status_t ruuvi_platform_scheduler_execute (void)
{
  app_sched_execute();
  return RUUVI_DRIVER_SUCCESS;
}

ruuvi_driver_status_t ruuvi_platform_scheduler_event_put (void const *p_event_data, uint16_t event_size, ruuvi_scheduler_event_handler_t handler)
{
  ret_code_t err_code = app_sched_event_put(p_event_data, event_size, (app_sched_event_handler_t) handler);
  return ruuvi_platform_to_ruuvi_error(&err_code);
}Timer
Closely tied with the scheduler is a timer and timed tasks. We could run the tasks in timer interrupts, but as we have the scheduler we’ll take advantage of it and only schedule the tasks in timer interrupts.
Timer interface
A millisecond resolution is good enough for our needs and it is conveniently same resolution as our Real Time Clock (RTC) driver has. We might want to execute some tasks only once, or we might want to leave the tasks running forever. Our timer interface has functions for initialization, creating a timer, starting a timer and stopping a timer.
typedef enum {
  RUUVI_INTERFACE_TIMER_MODE_SINGLE_SHOT,
  RUUVI_INTERFACE_TIMER_MODE_REPEATED
}ruuvi_interface_timer_mode_t;

/**
 * Function to be called when timer event occurs.
 */
typedef void(*ruuvi_timer_timeout_handler_t)(void* p_context);

// Calls whatever initialization is required by application timers
ruuvi_driver_status_t ruuvi_platform_timers_init(void);

//return true if timers have been successfully initialized.
bool platform_timers_is_init(void);

/* Function for creating a timer instance
 *
 * @param p_timer_id pointer to timer id, outputs ID which can be used to control the timer
 * @param mode mode of the timer, single shot or repeated
 * @param timeout_handler function which gets called
 */
ruuvi_driver_status_t ruuvi_platform_timer_create(ruuvi_platform_timer_id_t const *p_timer_id, ruuvi_interface_timer_mode_t mode, ruuvi_timer_timeout_handler_t timeout_handler);

/**
 * Start given timer at a mode defined in ruuvi_platform_timer_create. This operation is ignored if timer is already running.
 *
 * @param timer_id id of timer to control
 * @param timeout (or interval) of timer in milliseconds
 *
 * Return RUUVI_DRIVER_SUCCESS on success, error code on start.
 */
ruuvi_driver_status_t ruuvi_platform_timer_start (ruuvi_platform_timer_id_t timer_id, uint32_t ms);

/**
 * Stop a running timer.
 *
 * @param timer_id id of timer to stop
 * returns RUUVI_DRIVER_SUCCESS on success, error code from stack on error
 */
ruuvi_driver_status_t ruuvi_platform_timer_stop (ruuvi_platform_timer_id_t timer_id);One oddity arises from using the Nordic SDK timer driver. The timers are allocated at compile time, which requires defining the timer using a macro. As the macro must define a timer of a correct type, we have to include a header from platform files to define the timer type. This is somewhat unwanted dependency between the interface and implementation, ideally our interface wouldn’t need any information about the underlying details. Any ideas on how to work around the issue are welcome.
Timer Driver
Our timer driver will wrap the interface calls to the Nordic SDK. We can spot familiar lines 9 and 10 in init function, our timer uses the same Low-Frequency Clock (LFCLK) as the RTC and Softdevice.
static bool m_is_init = false;

ruuvi_driver_status_t ruuvi_platform_timers_init(void)
{
  if (m_is_init) { return RUUVI_DRIVER_SUCCESS; }
  ret_code_t err_code = NRF_SUCCESS;

  // Initialize clock if not already initialized
  if(false == nrf_drv_clock_init_check()){ err_code |= nrf_drv_clock_init(); }
  nrf_drv_clock_lfclk_request(NULL);

  err_code |= app_timer_init();
  if (NRF_SUCCESS == err_code) { m_is_init = true; }
  return ruuvi_platform_to_ruuvi_error(&err_code);
}

//return true if timers have been successfully initialized.
bool ruuvi_platform_timers_is_init(void)
{
  return m_is_init;
}

ruuvi_driver_status_t ruuvi_platform_timer_create (ruuvi_platform_timer_id_t const *p_timer_id, ruuvi_interface_timer_mode_t mode, ruuvi_timer_timeout_handler_t timeout_handler)
{
  app_timer_mode_t nrf_mode = APP_TIMER_MODE_SINGLE_SHOT;
  if (RUUVI_INTERFACE_TIMER_MODE_REPEATED == mode) { nrf_mode = APP_TIMER_MODE_REPEATED; }

  ret_code_t err_code = app_timer_create (p_timer_id,
                        nrf_mode,
                        (app_timer_timeout_handler_t)timeout_handler);
  return ruuvi_platform_to_ruuvi_error(&err_code);
}

ruuvi_driver_status_t ruuvi_platform_timer_start (ruuvi_platform_timer_id_t timer_id, uint32_t ms)
{
  ret_code_t err_code = app_timer_start(timer_id, APP_TIMER_TICKS(ms), NULL);
  return ruuvi_platform_to_ruuvi_error(&err_code);

}

ruuvi_driver_status_t ruuvi_platform_timer_stop (ruuvi_platform_timer_id_t timer_id)
{
  ret_code_t err_code = app_timer_stop(timer_id);
  return ruuvi_platform_to_ruuvi_error(&err_code);
}Integrating it to the Application
We’ll make a few changes to the application. First we change the BME280 oversampling to infinite impulse response filtering and put sensor into continuous mode — effectively trading longer step response time for lower power consumption in the measurement.
As the accelerometer and environmental sensors are now free-running, we can only read the latest data from the sensor instead of having a separate sampling start task and data read task.
Our battery measurement does not support such a continuous mode, even if our driver does emulate it. Therefore we add a task to sample the battery and run it on a repeated mode every 30 seconds.
RUUVI_PLATFORM_TIMER_ID_DEF(adc_timer);

//handler for scheduled accelerometer event
static void task_adc_scheduler_task(void *p_event_data, uint16_t event_size)
{
  // Take new ADC sample
  task_adc_sample();
}

// Timer callback, schedule accelerometer event here.
static void task_adc_timer_cb(void* p_context)
{
  ruuvi_platform_scheduler_event_put(NULL, 0, task_adc_scheduler_task);
}

ruuvi_driver_status_t task_adc_init(void)
{
  ruuvi_driver_status_t err_code = RUUVI_DRIVER_SUCCESS;
  ruuvi_driver_bus_t bus = RUUVI_DRIVER_BUS_NONE;
  uint8_t handle = RUUVI_INTERFACE_ADC_AINVDD;

  // Initialize timer for adc task. Note: the timer is not started.
  err_code |= ruuvi_platform_timer_create(&adc_timer, RUUVI_INTERFACE_TIMER_MODE_REPEATED, task_adc_timer_cb);

  err_code |= ruuvi_interface_adc_mcu_init(&adc_sensor, bus, handle);
  RUUVI_DRIVER_ERROR_CHECK(err_code, RUUVI_DRIVER_SUCCESS);

  if(RUUVI_DRIVER_SUCCESS == err_code)
  {
    err_code |= task_adc_configure();
    // Start the ADC timer here
    err_code |= ruuvi_platform_timer_start(adc_timer, APPLICATION_ADC_SAMPLE_INTERVAL_MS);
    return err_code;
  }

  // Return error if ADC could not be configured
  return RUUVI_DRIVER_ERROR_NOT_FOUND;
}Above gist shows the task-timer-scheduler interaction. First we create a timer on line 23 in repeated mode. On line 32 we start the timer at a predefined interval. In timer callback task_adc_timer_adc we schedule the sampling to be run at next call to ruuvi_platform_scheduler_execute()
Finally we add a task which is run at our broadcast interval to update the bluetooth data — effectively updating the data for every transmission. A perfectionist might notice that the random delay in BLE transmission interval will cause the transmission and sampling events to drift apart, this eventually leads to a single sample not being transmitted. It’s not serious by any means so we won’t be adjusting to it yet. We also remove the button data update functionality as it is no longer needed.
RUUVI_PLATFORM_TIMER_ID_DEF(advertisement_timer);
static ruuvi_interface_communication_t channel;

//handler for scheduled advertisement event
static void task_advertisement_scheduler_task(void *p_event_data, uint16_t event_size)
{
  // Update BLE data
  task_advertisement_send_3();
}

// Timer callback, schedule advertisement event here.
static void task_advertisement_timer_cb(void* p_context)
{
  ruuvi_platform_scheduler_event_put(NULL, 0, task_advertisement_scheduler_task);
}

ruuvi_driver_status_t task_advertisement_init(void)
{
  ruuvi_driver_status_t err_code = RUUVI_DRIVER_SUCCESS;
  err_code |= ruuvi_interface_communication_ble4_advertising_init(&channel);
  err_code |= ruuvi_interface_communication_ble4_advertising_tx_interval_set(APPLICATION_ADVERTISING_INTERVAL);
  int8_t target_power = APPLICATION_ADVERTISING_POWER;
  err_code |= ruuvi_interface_communication_ble4_advertising_tx_power_set(&target_power);
  err_code |= ruuvi_interface_communication_ble4_advertising_manufacturer_id_set(RUUVI_BOARD_BLE_MANUFACTURER_ID);
  err_code |= ruuvi_platform_timer_create(&advertisement_timer, RUUVI_INTERFACE_TIMER_MODE_REPEATED, task_advertisement_timer_cb);
  err_code |= ruuvi_platform_timer_start(advertisement_timer, APPLICATION_ADVERTISING_INTERVAL);
  return err_code;
}Our initialization creates and starts timer which schedules data update
We’ll take advantage of our main loop which goes to sleep until an event occurs. We can wait for events and process the entire schedule after an event has brought the tag out of sleep.
/**
 * Ruuvi Firmware 3.x code. Reads the sensors onboard RuuviTag and broadcasts the sensor data in a manufacturer specific format.
 *
 * License: BSD-3
 * Author: Otso Jousimaa <otso@ojousima.net>
 **/

#include "application_config.h"
#include "ruuvi_interface_log.h"
#include "ruuvi_interface_scheduler.h"
#include "ruuvi_interface_yield.h"
#include "ruuvi_boards.h"
#include "task_acceleration.h"
#include "task_adc.h"
#include "task_advertisement.h"
#include "task_button.h"
#include "task_environmental.h"
#include "task_led.h"
#include "task_nfc.h"
#include "task_power.h"
#include "task_rtc.h"
#include "task_scheduler.h"
#include "task_spi.h"
#include "task_timer.h"
#include "test_sensor.h"

#include <stdio.h>

int main(void)
{
  // Init logging
  ruuvi_driver_status_t status = RUUVI_DRIVER_SUCCESS;
  status |= ruuvi_platform_log_init(APPLICATION_LOG_LEVEL);
  RUUVI_DRIVER_ERROR_CHECK(status, RUUVI_DRIVER_SUCCESS);

  // Init yield
  status |= ruuvi_platform_yield_init();
  RUUVI_DRIVER_ERROR_CHECK(status, RUUVI_DRIVER_SUCCESS);

  // Init GPIO
  status |= ruuvi_platform_gpio_init();
  RUUVI_DRIVER_ERROR_CHECK(status, RUUVI_DRIVER_SUCCESS);

  // Initialize LED gpio pins, turn RED led on.
  status |= task_led_init();
  status |= task_led_write(RUUVI_BOARD_LED_RED, TASK_LED_ON);
  RUUVI_DRIVER_ERROR_CHECK(status, RUUVI_DRIVER_SUCCESS);

  // Initialize SPI
  status |= task_spi_init();
  RUUVI_DRIVER_ERROR_CHECK(status, RUUVI_DRIVER_SUCCESS);

  // Initialize RTC, timer and scheduler
  status |= task_rtc_init();
  status |= task_timer_init();
  status |= task_scheduler_init();
  RUUVI_DRIVER_ERROR_CHECK(status, RUUVI_DRIVER_SUCCESS);

  // Initialize power
  status |= task_power_dcdc_init();
  RUUVI_DRIVER_ERROR_CHECK(status, RUUVI_DRIVER_SUCCESS);

  #if RUUVI_RUN_TESTS
  // Tests will initialize and uninitialize the sensors, run this before using them in application
  test_sensor_run();

  // Print unit test status, activate tests by building in DEBUG configuration under SES
  size_t tests_run, tests_passed;
  test_sensor_status(&tests_run, &tests_passed);
  char message[128] = {0};
  snprintf(message, sizeof(message), "Tests ran: %u, passed: %u\r\n", tests_run, tests_passed);
  ruuvi_platform_log(RUUVI_INTERFACE_LOG_INFO, message);
  #endif

  // Initialize nfc
  status |= task_nfc_init();
  RUUVI_DRIVER_ERROR_CHECK(status, RUUVI_DRIVER_SUCCESS);

  // Initialize ADC
  status |= task_adc_init();
  RUUVI_DRIVER_ERROR_CHECK(status, RUUVI_DRIVER_SUCCESS);

  // Initialize environmental- nRF52 will return ERROR NOT SUPPORTED on RuuviTag basic
  // if DSP was configured, log warning
  status |= task_environmental_init();
  RUUVI_DRIVER_ERROR_CHECK(status, RUUVI_DRIVER_ERROR_NOT_SUPPORTED);

  // Allow NOT FOUND in case we're running on basic model
  status = task_acceleration_init();
  RUUVI_DRIVER_ERROR_CHECK(status, RUUVI_DRIVER_ERROR_NOT_FOUND);

  // Initialize button with on_button task
  status = task_button_init(RUUVI_INTERFACE_GPIO_SLOPE_HITOLO, task_button_on_press);
  RUUVI_DRIVER_ERROR_CHECK(status, RUUVI_DRIVER_ERROR_NOT_FOUND | RUUVI_DRIVER_ERROR_NOT_SUPPORTED);

  // Initialize BLE
  status |= task_advertisement_init();
  RUUVI_DRIVER_ERROR_CHECK(status, RUUVI_DRIVER_SUCCESS);

  // Turn RED led off. Turn GREEN LED on if no errors occured
  status |= task_led_write(RUUVI_BOARD_LED_RED, TASK_LED_OFF);
  if(RUUVI_DRIVER_SUCCESS == status)
  {
    status |= task_led_write(RUUVI_BOARD_LED_GREEN, TASK_LED_ON);
    ruuvi_platform_delay_ms(1000);
  }
  // Reset any previous errors, turn LEDs off
  status = task_led_write(RUUVI_BOARD_LED_GREEN, TASK_LED_OFF);

  while (1)
  {
    // Turn off activity led
    status = task_led_write(RUUVI_BOARD_LED_RED, !RUUVI_BOARD_LEDS_ACTIVE_STATE);
    // Sleep
    status |= ruuvi_platform_yield();
    // Turn on activity led
    status |= task_led_write(RUUVI_BOARD_LED_RED, RUUVI_BOARD_LEDS_ACTIVE_STATE);
    // Execute scheduled tasks
     status |= ruuvi_platform_scheduler_execute();
    // Reset only on fatal error
    RUUVI_DRIVER_ERROR_CHECK(status, ~RUUVI_DRIVER_ERROR_FATAL);
  }
}Our main.c has only one function which starts the tasks and goes to sleep. When an event — such as timer event — occurs, our execution leaves the ruuvi_platform_yield and enters ruuvi_platform_scheduler_execute. After the scheduled tasks are complete, we can go back to sleep.
Power Consumption
Our project is nearing feature parity with the official Ruuvi Firmware. We’re missing watchdog, bootloader and URL mode, but otherwise the tag now has same features as the official firmware. Let’s check the power consumption.
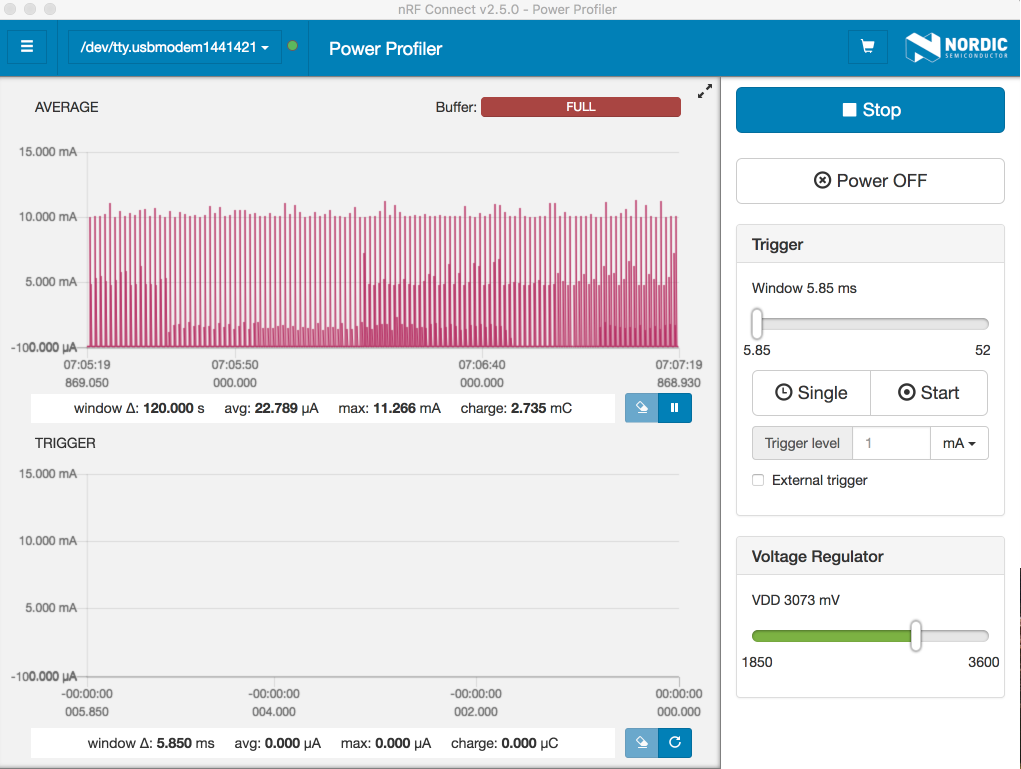
Our measured power consumption is now 23 μA, while the official firmware consumes 24 μA during same operation. It’s not really possible to draw a conclusion that we’d optimized anything as the measurement accuracy of power profiler kit is ± 20 %.
Conclusion
We have now implemented a simple yet powerful low-power sensor beacon firmware. Our next few blog posts are about adding some features, such as bootloader for wireless software updates, improving the battery voltage reads and adding motion interrupts.
Stay tuned and follow @ojousima and @ruuvicom on Twitter for #FirmwareFriday posts!