
– updated 2021–12–23 –
Because Ruuvi Gateway now fills the need of RuuviTag to Internet Gateway, we no longer maintain the RuuviBerry image. These instructions are left online for your reference, but they will no longer be supported.
– updated 2020–10–26 –
As RuuviTags do not have internet connectivity by themselves, people interested in storing the data to the cloud need to setup something with Bluetooth and Internet connection as a gateway. Raspberry Pi 3 is a natural choice as it has inbuilt BLE and WiFi as well as plenty of processing power — all in reasonable cost and lowish power consumption of <10 watts.
Our Raspberry Pi image has these components:
- Rasbian as the base OS
- WiFi hotspot to allow nearby devices to connect to it.
- RuuviCollector to collect data
- InfluxDB as a database
- Grafana to provide a dashboard to InfluxDB
Setting up the image
First we download an official Rasbian image from the Raspberry Pi foundation. Image is flashed to 16 GB SD card with the instructions and programs as described by Raspberry Pi foundation. If you plan to use Raspberry Pi as a headless node without monitor or keyboard attached, you have to set the card up for SSH connection by placing file called ssh into boot partition. You might also want to configure WiFi by placing wpa_supplicant.conf file into boot. Howtoraspberrypi has published a post with more details.
Once you log in, remember to update the Pi by running sudo apt update and sudo apt upgrade.
Configuring the hotspot
Configuring the Raspberry Pi as a WiFi hotspot simplifies your users life by providing wireless connection to the Raspberry Pi without need to set up Ethernet connection from the router, look up IP address etc.
We use RaspiWiFi project to set up the wifi hotspot. The hotspot can then be used to configure other WiFi connection or to access Raspi as a standalone device.
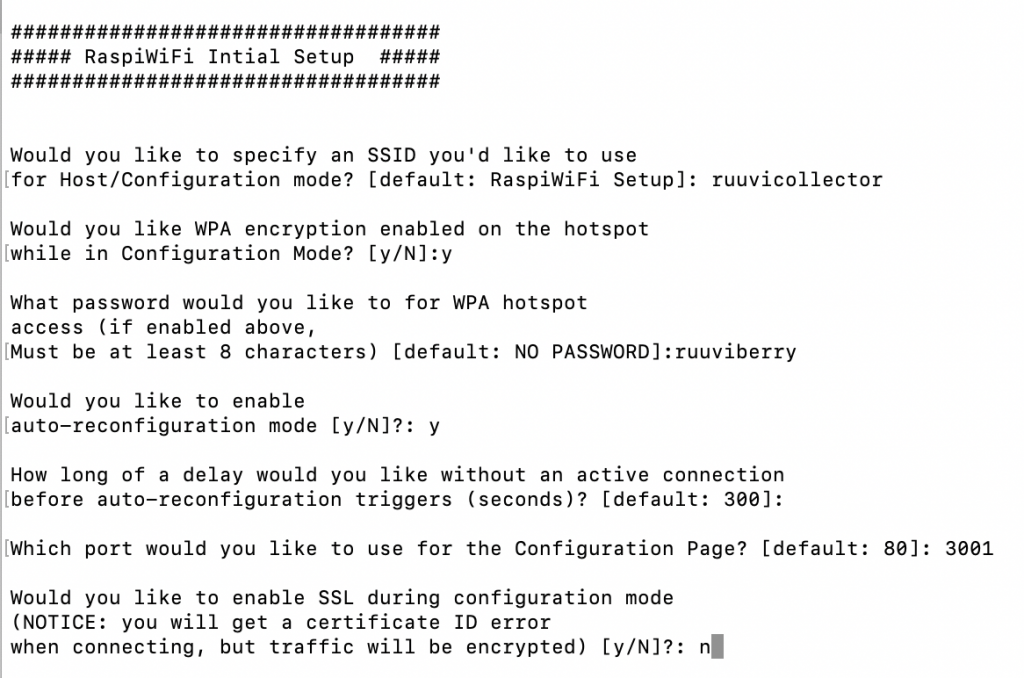
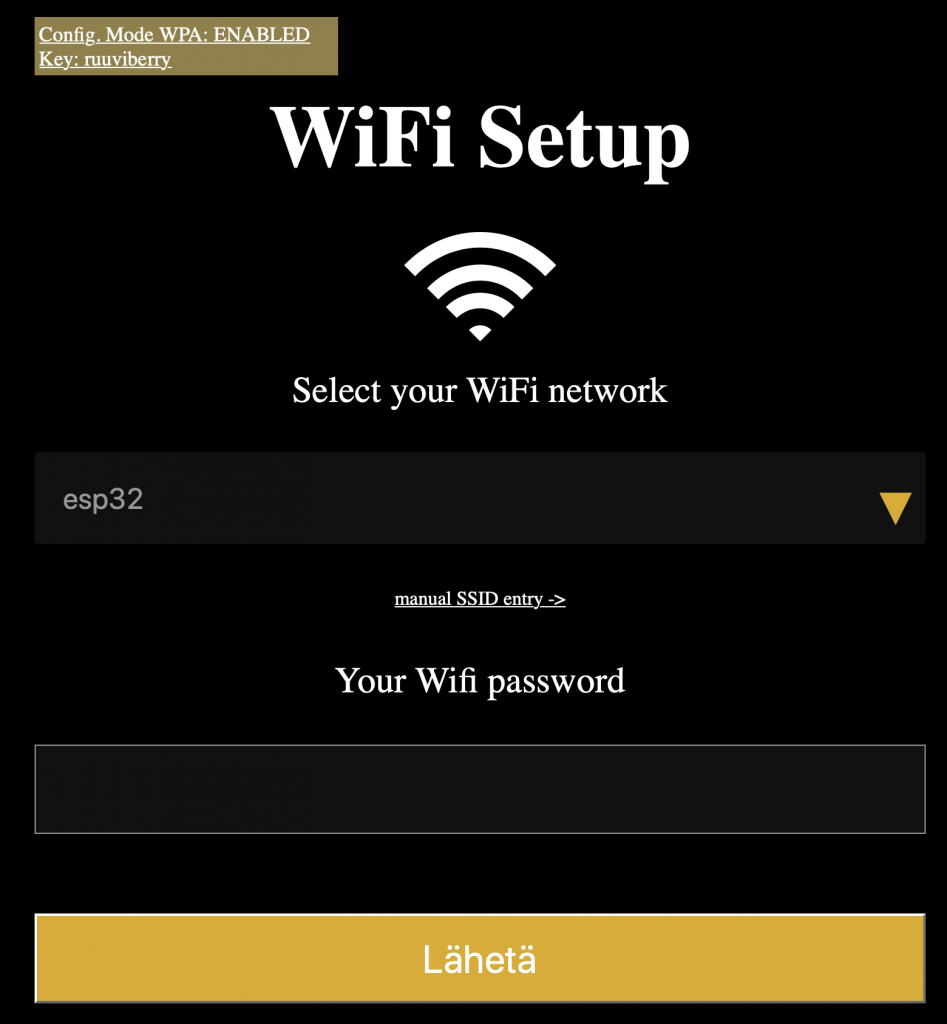
Now we have a hotspot with a landing page for configuring WiFi connection, and we can use Raspberry Pi as a standalone device if need be. The Hotspot name is ruuvicollector xxxx and password ruuviberry.
The Raspberry Pi can be accessed by connecting to the hotspot and browsing to 10.0.0.1 to view Grafana or 10.0.0.1:3001 to configure WiFi.
InfluxDB
InfluxDB is a database specialized for time series data, which is perfect for storing RuuviTag data. Influx data provides .deb builds for armhf, even if they do not advertise it. Just browse over to Influx downloads, select amd64 package and replace the amd64 with armhf. For example:
https://dl.influxdata.com/influxdb/releases/influxdb_1.5.2_amd64.deb becomes
https://dl.influxdata.com/influxdb/releases/influxdb_1.5.2_armhf.deb
Download the package with wget and install with sudo dpkg -i. Start the service with sudo systemctl start influxd and verify it is running with systemctl status influxd.
Start influx console with influx, and create database for ruuvi measurements with command CREATE DATABASE ruuvi.
Grafana
Grafana is used to create dashboard and run some simple analytics on data. Download latest grafana binaries for Raspberry Pi from Grafana official distribution. Raspberry Pi 3, 3B+ and 4 use ARMv7.
Enable grafana with
sudo /bin/systemctl daemon-reload
sudo /bin/systemctl enable grafana-server
sudo /bin/systemctl start grafana-server
sudo /bin/systemctl status grafana-server
If everything has been properly set up, we can now browse over to raspberrypi.local:3000 and see web-ui of grafana. Default user and password is admin/admin. We change the password to ruuviberry on change password prompt.

Setup the connection to InfluxDB with “set up datasource” option. Settings:
Name: Ruuvi
Type: InfluxDB
URL: http://localhost:8086
Access: proxy
Auth: blank
Database: ruuvi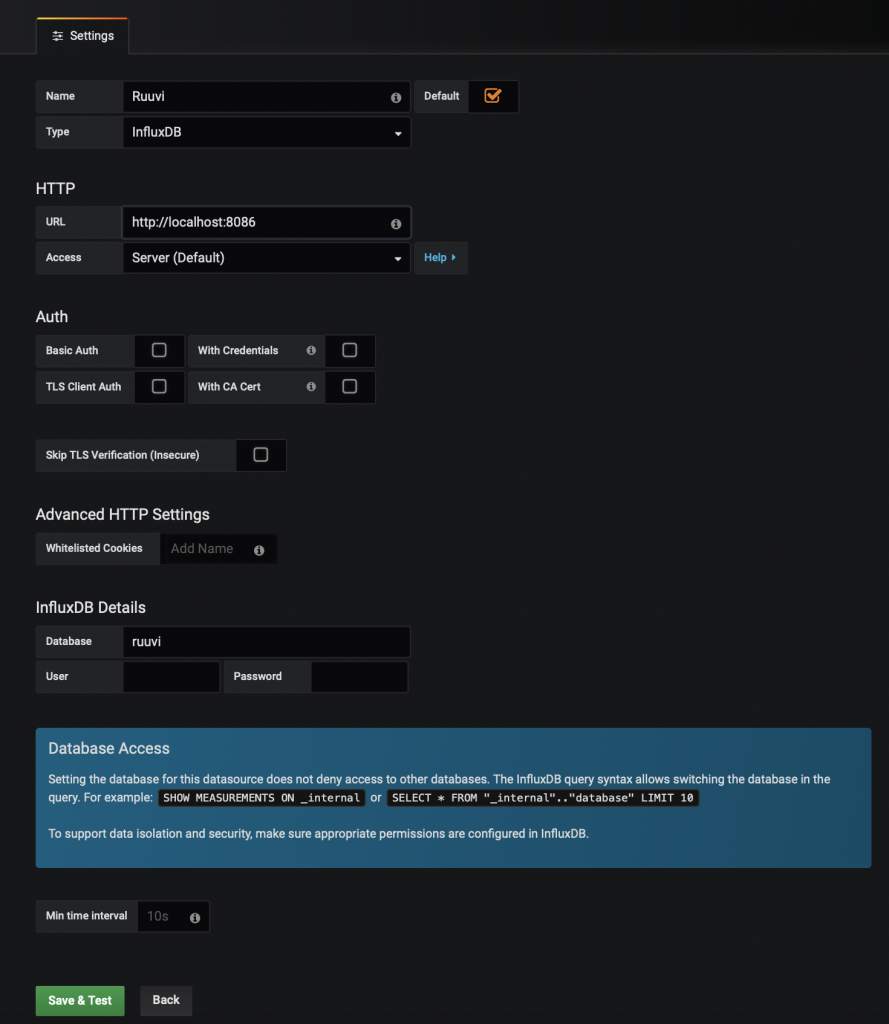
RuuviCollector
RuuviCollector is a Java program which listens to HCIDump and parses RuuviTag data. It also provides some analytics, such as dew point based on humidity and temperature. Follow the instructions on github repository to install the RuuviCollector. Ruuvitag-sensor python library has some additional instructions on setting up the permissions of Bluetooth adapter of Raspberry Pi.
In my case, these commands are required to download dependencies and setup permissions:
sudo apt install openjdk-11-jdk
sudo apt install bluez bluez-hcidump
sudo setcap 'cap_net_raw,cap_net_admin+eip' `which hcitool`
sudo setcap 'cap_net_raw,cap_net_admin+eip' `which hcidump`
You can test the RuuviCollector by running
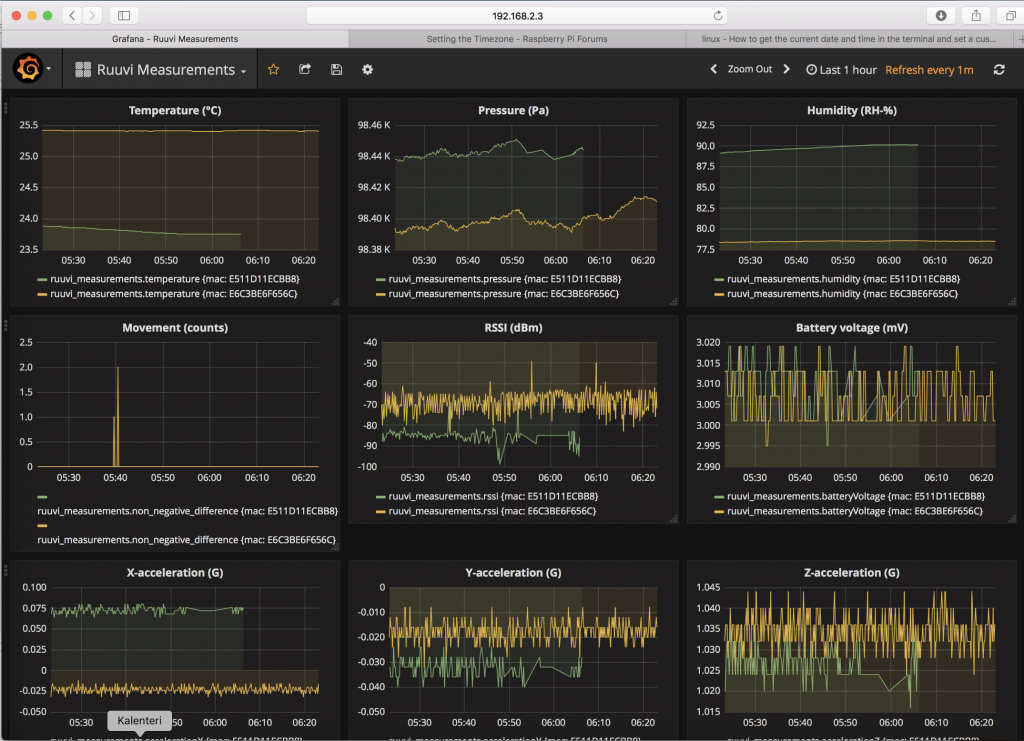
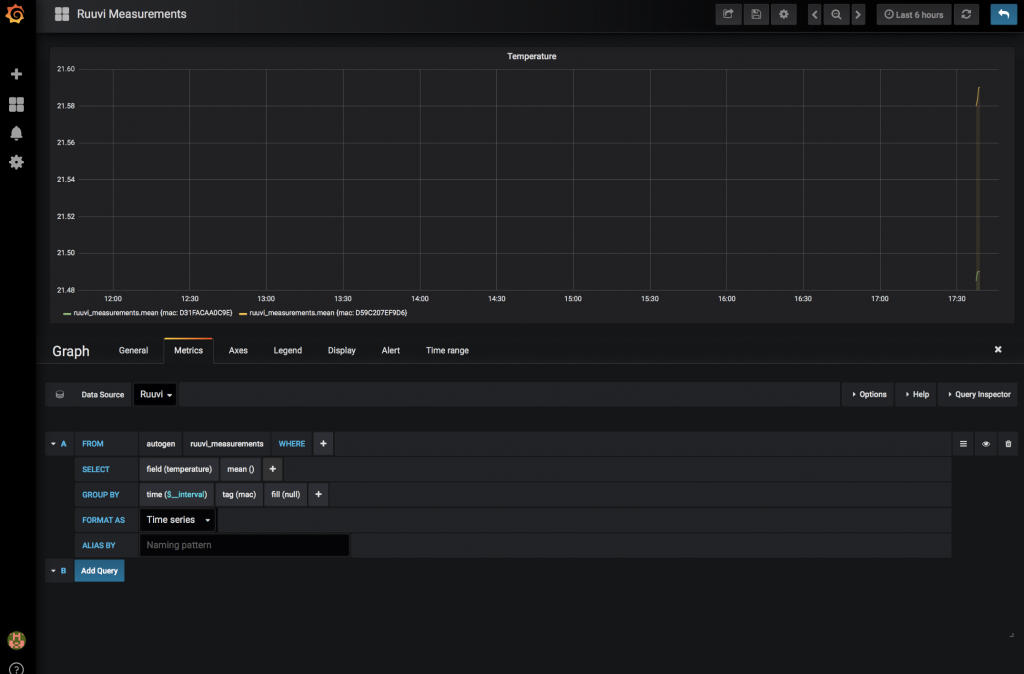
java -jar ruuvi-collector-0.2.jar. Browse back to raspberrypi.local:3000, create your first dashboard and add a panel. Add settings for displaying the temperature:
Data Source: Ruuvi
From: autogen ruuvi_measurements
Select: field(temperature) mean()
Group By: time($_interval) tag(mac) fill(null)
Format as: Time series.
This selects mean of temperatures by mac within interval which depends on selected time axis. This allows reasonable performance while plotting large datasets and good precision while plotting small dataset. However you might not see any samples in very short time ranges, adjust time interval if your dashboard is blank.
Finishing touches
As we have verified that the basis of the gateway is good, let’s polish it a little. First, create a systemd script for automatically starting the RuuviCollector on boot. Create ruuvicollector.service and add this content, possibly adjusting paths as required:
[Unit]
Description=RuuviCollector Service
After=network.target[Service]
Type=simple
User=pi
WorkingDirectory=/home/pi/RuuviCollector
ExecStart=/usr/bin/java -jar /home/pi/RuuviCollector/ruuvi-collector-0.2.jar
Restart=always
[Install]
WantedBy=multi-user.target
Then, run these commands to install the systemd script:
sudo cp ruuvicollector.service /etc/systemd/system/
sudo systemctl start ruuvicollector.service
sudo systemctl status ruuvicollector.service
sudo systemctl enable ruuvicollector.service
Now RuuviCollector should start automatically on boot.
Next, route port 80 to 3000 so your users don’t have to enter the :3000 at the end of the URL.
sudo apt install nftables
sudo /sbin/iptables -t nat -I PREROUTING -p tcp --dport 80 -j REDIRECT --to-port 3000
sudo apt install iptables-persistent
Test the routing by browsing to http://raspberrypi.local. Now you can reboot the Pi and soon it should be back online and collecting data for you.
You can find some grafana dashboard templates at https://github.com/ruuvi/ruuvi.grafana-dashboards.json .
We also enable anonymous view access for grafana so we don’t have to sign in to view the data. Open /etc/grafana/grafana.ini in text editor and enable the anonymous view.
### Anonymous Auth ###
[auth.anonymous]
# enable anonymous access
enabled = true
For greater security, we replace the default password with ruuviberry and hostname with ruuvicollector using raspi-config.
The BT interface over UART has occasional bit errors which manifests as invalid data. We fix this by lowering UART speed as instructed in this forum post.
sudo -i
cp -pi /usr/bin/btuart /usr/bin/btuart.orig
sed -e 's/921600/460800/g' < /usr/bin/btuart.orig > /usr/bin/btuart
diff -u /usr/bin/btuart.orig /usr/bin/btuart
exit
The RaspiWifi updates the hotspot WiFi SSID if the SSID in /etc/hostapd/hostapd.conf does not match the configured prefix, so we edit the prefix to “replaceme” at this point. It will be replaced to prefix + 4 letters from HWID on next boot. This allows migrating the image to other Pi’s and having a new SSID for them instead of fixed SSID of our current PI. Note: on 2020–01 version of RaspiWiFi the postfix will be 1.1 on Rasbian Buster
Finally, you can power down, backup the SD card and shrink the Raspbberry Pi image with pishrink. This allows you to fit the Pi image to different Raspberry Pi cards. Just remember to run raspi-config and expand the file system when you take the image out of the storage.
You can also use this Playbook to generate your own up-to-date image. https://github.com/ilatvala/ruuvigw
Happy Hacking!