In this part of the tutorial we’ll synchronize the battery voltage measurement to radio transmissions. Final code of this blog post can be downloaded at Ruuvi GitHub in the ruuviblog-branch, tag 3.13.0-alpha.
Please follow part 1 of the series for details on how to clone the repository and compile the code. Final hex of this tutorial can be downloaded from the Ruuvi Jenkins.
Update to SDK 15.2
In the previous part of the blog we used Nordic Software Development Kit(SDK) 15.2 version for the bootloader code and Softdevice s132 6.1.0 as the software radio. Let’s update the main project too.
Update is quick to do: We search for the old SDK and replace it with new SDK in project file and remove the “experimental_” prefix in log, ringbuf and memobj paths. A file pm_mutex.c is removed. Additionally we #define NRF_LOG_STR_PUSH_BUFFER_SIZE APPLICATION_LOG_BUFFER_SIZE in nrf5_sdk15_application_config.h to match the macro naming in SDK15.2 logging. The logging now uses ringbuf.c, we add it to the build. Then we allocate space for log_backends in our flash_placement.xml by adding definition to flash sections:
<ProgramSection alignment="4" keep="Yes" load="Yes" name=".log_backends" inputsections="*(SORT(.log_backends*))" address_symbol="__start_log_backends" end_symbol="__stop_log_backends" />The clock enable directive has also changed from CLOCK_ENABLED to NRF_CLOCK_ENABLED, therefore we add a wrapper to sdk_config.h
#ifndef NRF_CLOCK_ENABLED
#define NRF_CLOCK_ENABLED CLOCK_ENABLED
#endif
Nordic has added nfc_fixes.h definitions to the SDK, we no longer require HAL_NFC_ENGINEERING_BC_FTPAN_WORKAROUND definition in preprocessor macros defined in ruuvi.firmware.c.emProject. After removal the project compiles without warnings and we’re good to go building on the updated SDK. Before flashing the program Softdevice version must be updated to 6.1.0 in the project file.
Revisiting Battery Measurement
After part 11 — scheduler we have been measuring the battery voltage at a roughly 30 second interval without caring about how the program is running otherwise.
This is a fine approach on a fresh battery in the room temperature, however when the internal resistance of the battery increases due to cold temperature and drain we’ll start experiencing voltage droop on battery during peak load — the radio activity.
Therefore we’ll register an event handler to be called after radio transmission and check in our event handler if it’s time to run another Analog-to-Digital Converter (ADC) measurement on battery.
Interface
We already have a radio activity event defined in our ruuvi_interface_communication_radio.h. We add a function to set up an application event handler on radio interrupts on line 41:
typedef enum
{
  RUUVI_INTERFACE_COMMUNICATION_RADIO_BEFORE,
  RUUVI_INTERFACE_COMMUNICATION_RADIO_AFTER
}ruuvi_interface_communication_radio_activity_evt_t;

typedef enum
{
  RUUVI_INTERFACE_COMMUNICATION_RADIO_UNINIT = 0,
  RUUVI_INTERFACE_COMMUNICATION_RADIO_ADVERTISEMENT,
  RUUVI_INTERFACE_COMMUNICATION_RADIO_GATT,
  RUUVI_INTERFACE_COMMUNICATION_RADIO_MESH
}ruuvi_interface_communication_radio_user_t;

/**
 *  Type of radio activity interrupt. This is common to all radio modules, i,e, the callback gets called for every radio action.
 */
typedef void(*ruuvi_interface_communication_radio_activity_interrupt_fp_t)(const ruuvi_interface_communication_radio_activity_evt_t evt);

// Enable / disable radio stacks
ruuvi_driver_status_t ruuvi_interface_communication_radio_init  (const ruuvi_interface_communication_radio_user_t handle);
ruuvi_driver_status_t ruuvi_interface_communication_radio_uninit(const ruuvi_interface_communication_radio_user_t handle);

/**
 * Writes maximum 64-bit unique address of the device to the pointer. This address
 * may be changed during runtime. The address is identifier of the device on radio network,
 * such as BLE MAC address.
 *
 * parameter address: Output, value of address.
 *
 * return RUUVI_DRIVER_SUCCESS on success
 * return RUUVI_DRIVER_ERROR_NOT_SUPPORTED if address cannot be returned on given platform
 */
ruuvi_driver_status_t ruuvi_interface_communication_radio_address_get(uint64_t* const address);

/**
 * Setup radio activity interrupt
 *
 * parameter handler: Function to call on radio event NULL to disable radio-level callback, however module-level callbacks (advertising, GATT etc) will be called.
 */
void ruuvi_interface_communication_radio_activity_callback_set(const ruuvi_interface_communication_radio_activity_interrupt_fp_t handler);Driver
Next we implement the interface in our nrf5_sdk15_platform/ruuvi_platform_communication_radio.c. We add a static function pointer waiting to be set and a setup function. Then we add a handler for Softdevice radio interrupt which will call the function pointer and an advertising module event handler in case we want to do some advertising-specific actions at a later point.
At line 43 we have added ble_radio_notification interrupt initialization. The interrupt priority is defined at application_config/ruuvi_platform_nrf5_sdk15_config.h as 2 which is the highest application priority. Distance defines how long before and after the event interrupt is triggered, 800 μs is the closest distance we can get.
// Application callback for radio events
static ruuvi_interface_communication_radio_activity_interrupt_fp_t on_radio_activity_callback = NULL;

/**
 * Task to run on radio activity - call event handlers of radio modules and a common radio event handler.
 * This function is in interrupt context, avoid long processing or using peripherals.
 * Schedule any long tasks in application callbacks.
 *
 * parameter active: True if radio is going to be active after event, false if radio was turned off (after tx/rx)
 */
static void on_radio_evt(bool active)
{

  ruuvi_interface_communication_radio_activity_evt_t evt = active ? RUUVI_INTERFACE_COMMUNICATION_RADIO_BEFORE : RUUVI_INTERFACE_COMMUNICATION_RADIO_AFTER;
  // Call advertising event handler
  ruuvi_platform_communication_ble4_advertising_activity_handler(evt);

  // Call common event handler if set
  if(NULL != on_radio_activity_callback ){ on_radio_activity_callback(evt); }

}

ruuvi_driver_status_t ruuvi_interface_communication_radio_init  (const ruuvi_interface_communication_radio_user_t _handle)
{
  if(RUUVI_INTERFACE_COMMUNICATION_RADIO_UNINIT != handle) { return RUUVI_DRIVER_ERROR_INVALID_STATE; }

  ret_code_t err_code = NRF_SUCCESS;
  handle = _handle;
  err_code = nrf_sdh_enable_request();
  RUUVI_DRIVER_ERROR_CHECK(err_code, NRF_SUCCESS);

  // Configure the BLE stack using the default settings.
  // Fetch the start address of the application RAM.
  uint32_t ram_start = 0;
  err_code |= nrf_sdh_ble_default_cfg_set(NRF5_SDK15_BLE4_STACK_CONN_TAG, &ram_start);
  RUUVI_DRIVER_ERROR_CHECK(err_code, NRF_SUCCESS);

  // Enable BLE stack.
  err_code |= nrf_sdh_ble_enable(&ram_start);
  RUUVI_DRIVER_ERROR_CHECK(err_code, NRF_SUCCESS);

  // Initialize radio interrupts
  err_code |= ble_radio_notification_init(NRF5_SDK15_RADIO_IRQ_PRIORITY,
                                          NRF_RADIO_NOTIFICATION_DISTANCE_800US,
                                          on_radio_evt);

  return ruuvi_platform_to_ruuvi_error(&err_code);
}

.
.
.

void ruuvi_interface_communication_radio_activity_callback_set(const ruuvi_interface_communication_radio_activity_interrupt_fp_t handler)
{
  // Warn user if CB is not NULL and non-null pointer is set, do not overwrite previous pointer.
  if(NULL != handler && NULL != on_radio_activity_callback) { RUUVI_DRIVER_ERROR_CHECK(RUUVI_DRIVER_ERROR_INVALID_STATE, ~RUUVI_DRIVER_ERROR_FATAL); }
  else { on_radio_activity_callback = handler; }
}Testing it Out
For the sake of clarity the intermediate code while developing is not given here, final code will be presented afterwards. In short: The ADC task was set to sample the ADC at radio interrupt and toggle a General Purpose Input/Output (GPIO) pin, and this toggling was used to trigger oscilloscope measurements on supply voltage. First a little used battery was tested.
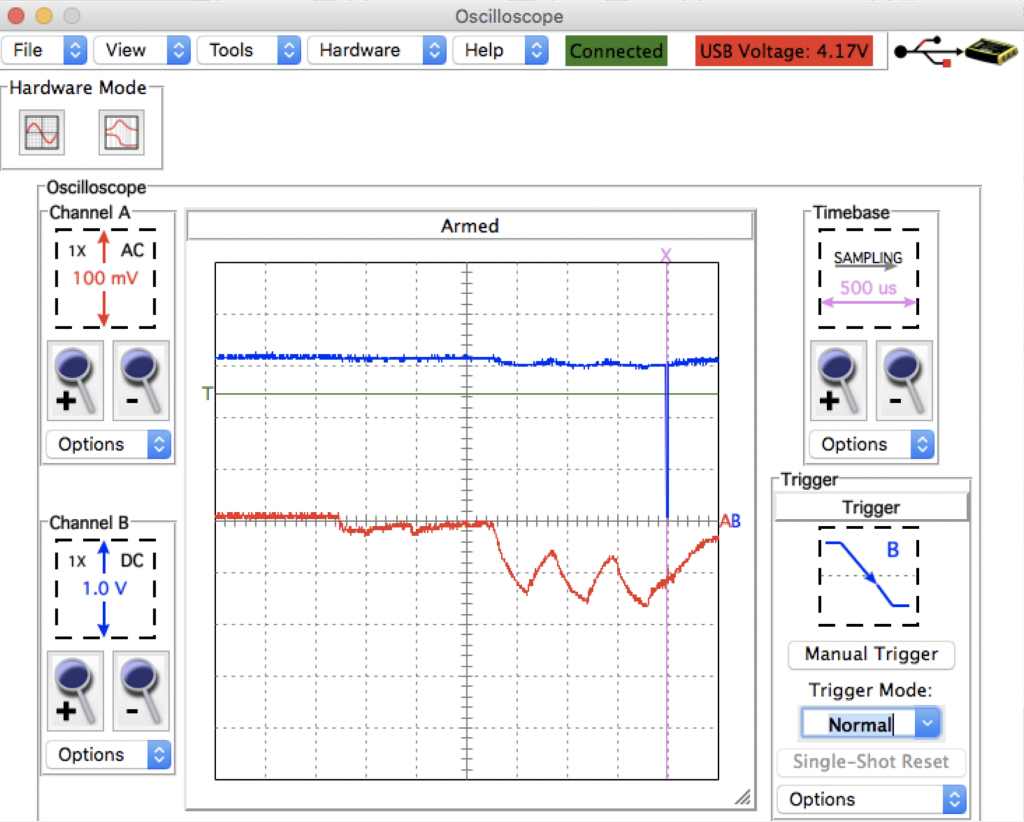
The AC-coupled line shows that we have some 150 mV droop on the line, and the ADC sample does not hit exactly on the lowest point. The supply voltage is a bit over 3 V. Let’s check a drained 2016-kickstarter era CR2450 battery next.
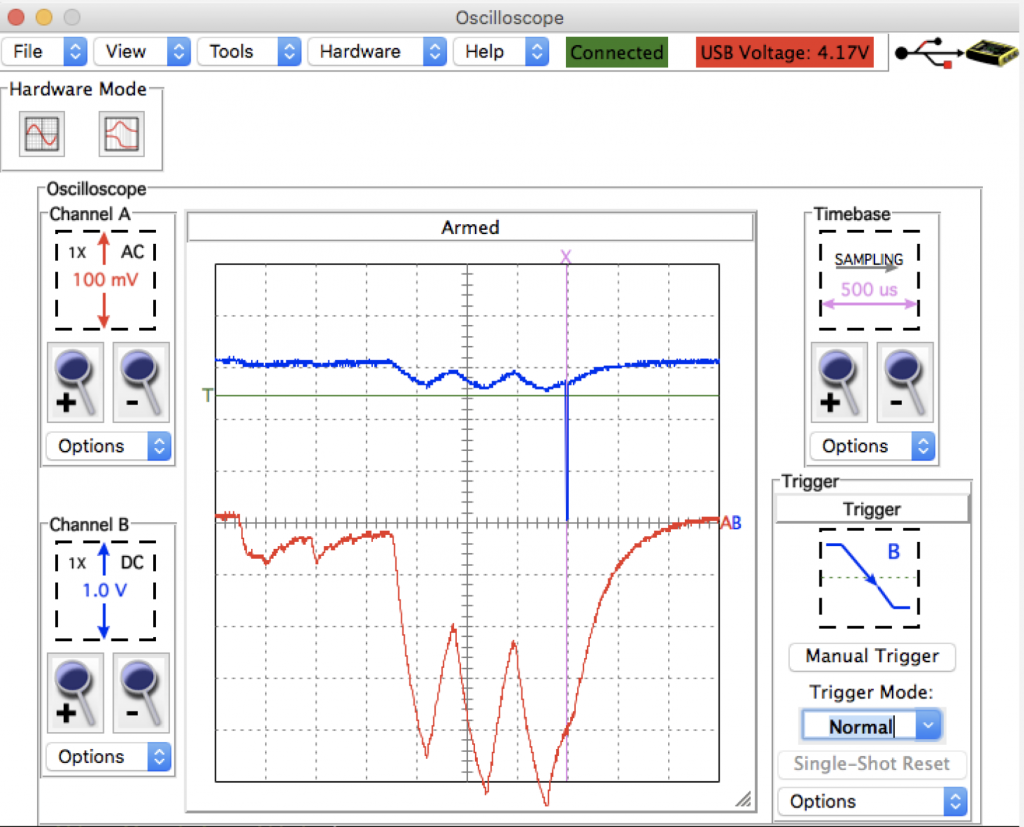
Here we can see a lot deeper droop of over 500 mV, even though the resting voltage is likewise at bit over 3 V. This gives us an idea: How about using the depth of voltage droop instead of absolute voltage to determine the battery state? We’ll explore this idea later on.
Integrating it to the Application
Now we have 3 distinct modes for ADC operation:
- Simple: Measure at regular intervals
- Radio: Measure after radio activity
- Droop: Measure voltage after radio activity and a few milliseconds afterwards to see the depth of the voltage droop
Let’s define these modes in application_config.h
/**
 * Data format configuration
 */
// Voltage mode - select one
#ifndef APPLICATION_BATTERY_VOLTAGE_MODE
#define APPLICATION_BATTERY_VOLTAGE_SIMPLE   0  // Simple mode: Not synchronized to anything, sampled at regular interval
#define APPLICATION_BATTERY_VOLTAGE_RADIO    1  // Radio mode: Voltage is sampled after radio tx, refreshed after interval has passed.
#define APPLICATION_BATTERY_VOLTAGE_DROOP    0  // Droop mode: Battery is read after TX and after a brief recovery period. Droop is reported
#endif
#define APPLICATION_BATTERY_DROOP_DELAY_MS   2  // Milliseconds between active and recovered tx
#if(APPLICATION_BATTERY_VOLTAGE_SIMPLE + APPLICATION_BATTERY_VOLTAGE_RADIO + APPLICATION_BATTERY_VOLTAGE_DROOP != 1)
  #error "Select application battery voltage monitor mode by defining one constant as 1"
#endifNext, let’s update task_adc.c initialization, timer and scheduler functions and register the ADC task to radio.
RUUVI_PLATFORM_TIMER_ID_DEF(adc_timer);
static ruuvi_driver_sensor_t adc_sensor = {0};
static uint64_t t_sample = 0;
static float droop = 0;
static float after_tx = 0;

/* Use these functions for using ADC at regular, timed intervals
 * Remember to start the timer at init
 */
//handler for scheduled accelerometer event
static void task_adc_scheduler_task(void *p_event_data, uint16_t event_size)
{
  ruuvi_driver_status_t status = RUUVI_DRIVER_SUCCESS;

  // Take new sample
  status |= task_adc_sample();
  // Log warning if adc sampling failed.
  RUUVI_DRIVER_ERROR_CHECK(status, ~RUUVI_DRIVER_ERROR_FATAL);
}

// Timer callback, schedule event here or execute it right away if it's timing-critical
static void task_adc_timer_cb(void* p_context)
{
  ruuvi_driver_status_t status = RUUVI_DRIVER_SUCCESS;
  ruuvi_interface_adc_data_t rest;

  // Simple mode
  if(APPLICATION_BATTERY_VOLTAGE_SIMPLE)
  {
    ruuvi_platform_scheduler_event_put(NULL, 0, task_adc_scheduler_task);
  }

  // Droop mode
  if(APPLICATION_BATTERY_VOLTAGE_DROOP)
  {
  // Take new ADC sample
  status |= task_adc_sample();

  // Read new sample
  status |= adc_sensor.data_get(&rest);
  RUUVI_DRIVER_ERROR_CHECK(status, RUUVI_DRIVER_SUCCESS);

  // Subtract active sample from rest sample
  droop = rest.adc_v - after_tx;
  if(0.0 > droop) { droop = 0.0; }
  }
}


// Callback for radio event. Configured to radio on TASK ADC INIT on droop mode and radio mode,
// see application_config.h
static void task_adc_trigger_on_radio(const ruuvi_interface_communication_radio_activity_evt_t evt)
{

  // If event is after radio activity
  if(RUUVI_INTERFACE_COMMUNICATION_RADIO_AFTER == evt)
  {
    // Sample
    if((APPLICATION_ADC_SAMPLE_INTERVAL_MS < ruuvi_platform_rtc_millis() - t_sample || 0 == t_sample))
    {
      // TEST: LED ON to see the sample time relative to supply voltage, oscilloscope triggered by this signal
      // task_led_write(RUUVI_BOARD_LED_GREEN, RUUVI_BOARD_LEDS_ACTIVE_STATE);

      t_sample = ruuvi_platform_rtc_millis();
      task_adc_sample();

      // Read radio-synched ADC sample
      ruuvi_driver_status_t status = RUUVI_DRIVER_SUCCESS;
      ruuvi_interface_adc_data_t active;
      status |= adc_sensor.data_get(&active);
      RUUVI_DRIVER_ERROR_CHECK(status, RUUVI_DRIVER_SUCCESS);
      after_tx = active.adc_v;

      // task_led_write(RUUVI_BOARD_LED_GREEN, !RUUVI_BOARD_LEDS_ACTIVE_STATE);

      // Sample again for droop mode
      if(APPLICATION_BATTERY_VOLTAGE_DROOP)
      {
        ruuvi_platform_timer_start(adc_timer, APPLICATION_BATTERY_DROOP_DELAY_MS);
      }
    }
  }
}

static ruuvi_driver_status_t task_adc_configure(void)
{
  ruuvi_driver_sensor_configuration_t config;
  config.samplerate    = APPLICATION_ADC_SAMPLERATE;
  config.resolution    = APPLICATION_ADC_RESOLUTION;
  config.scale         = APPLICATION_ADC_SCALE;
  config.dsp_function  = APPLICATION_ADC_DSPFUNC;
  config.dsp_parameter = APPLICATION_ADC_DSPPARAM;
  config.mode          = APPLICATION_ADC_MODE;
  if(NULL == adc_sensor.data_get) { return RUUVI_DRIVER_ERROR_INVALID_STATE; }
  return adc_sensor.configuration_set(&adc_sensor, &config);
}

ruuvi_driver_status_t task_adc_init(void)
{
  ruuvi_driver_status_t err_code = RUUVI_DRIVER_SUCCESS;
  ruuvi_driver_bus_t bus = RUUVI_DRIVER_BUS_NONE;
  uint8_t handle = RUUVI_INTERFACE_ADC_AINVDD;

  // Initialize timer for adc task.
  // Note: the timer is not started.
  // Note: use REPEATED mode for free-running sampling.
  ruuvi_interface_timer_mode_t mode = APPLICATION_BATTERY_VOLTAGE_SIMPLE ? RUUVI_INTERFACE_TIMER_MODE_REPEATED : RUUVI_INTERFACE_TIMER_MODE_SINGLE_SHOT;
  err_code |= ruuvi_platform_timer_create(&adc_timer, mode, task_adc_timer_cb);

  err_code |= ruuvi_interface_adc_mcu_init(&adc_sensor, bus, handle);
  RUUVI_DRIVER_ERROR_CHECK(err_code, RUUVI_DRIVER_SUCCESS);

  if(RUUVI_DRIVER_SUCCESS == err_code)
  {
    err_code |= task_adc_configure();

    // Start the ADC timer here if you use timer-based battery measurement
    if(true == APPLICATION_BATTERY_VOLTAGE_SIMPLE)
    {
      err_code |= ruuvi_platform_timer_start(adc_timer, APPLICATION_ADC_SAMPLE_INTERVAL_MS);
    }

    // Configure the radio callback here to synchronize radio to ADC, unless we're in simple mode
    if(false == APPLICATION_BATTERY_VOLTAGE_SIMPLE)
    {
      ruuvi_interface_communication_radio_activity_callback_set(task_adc_trigger_on_radio);
    }
    return err_code;
  }

  // Return error if ADC could not be configured
  return RUUVI_DRIVER_ERROR_NOT_FOUND;
}

.
.
.

ruuvi_driver_status_t task_adc_battery_get(ruuvi_interface_adc_data_t* const data)
{
  if(NULL == data) { return RUUVI_DRIVER_ERROR_NULL; }
  if(NULL == adc_sensor.data_get) { return RUUVI_DRIVER_ERROR_INVALID_STATE; }
  ruuvi_driver_status_t err_code = RUUVI_DRIVER_SUCCESS;
  data->timestamp_ms = t_sample;
  if(APPLICATION_BATTERY_VOLTAGE_SIMPLE) { err_code |= task_adc_data_get(data); }
  if(APPLICATION_BATTERY_VOLTAGE_RADIO)  { data->adc_v = after_tx; }
  if(APPLICATION_BATTERY_VOLTAGE_DROOP)  { data->adc_v = droop; }
  return err_code;
}
Our scheduler task is unchanged: We sample the ADC when the scheduler gets around to it. Our timer task now has a lot more content in it: in the simple mode we only schedule the ADC read as before, however in droop mode we sample the battery again immediately and store the difference to radio-synchronized measurement. If difference is less than zero we set the difference to zero as the data format expects unsigned value.
The radio callback takes a sample if the event is after radio activity and more time than the defined sample interval has passed, and reads it to the after_tx variable.
Finally we define task_adc_battery_get which decides if the application should receive the latest sample, sample stored after transmission or droop value.
We then adjust our task_advertising.c to get the battery voltage from the new task.
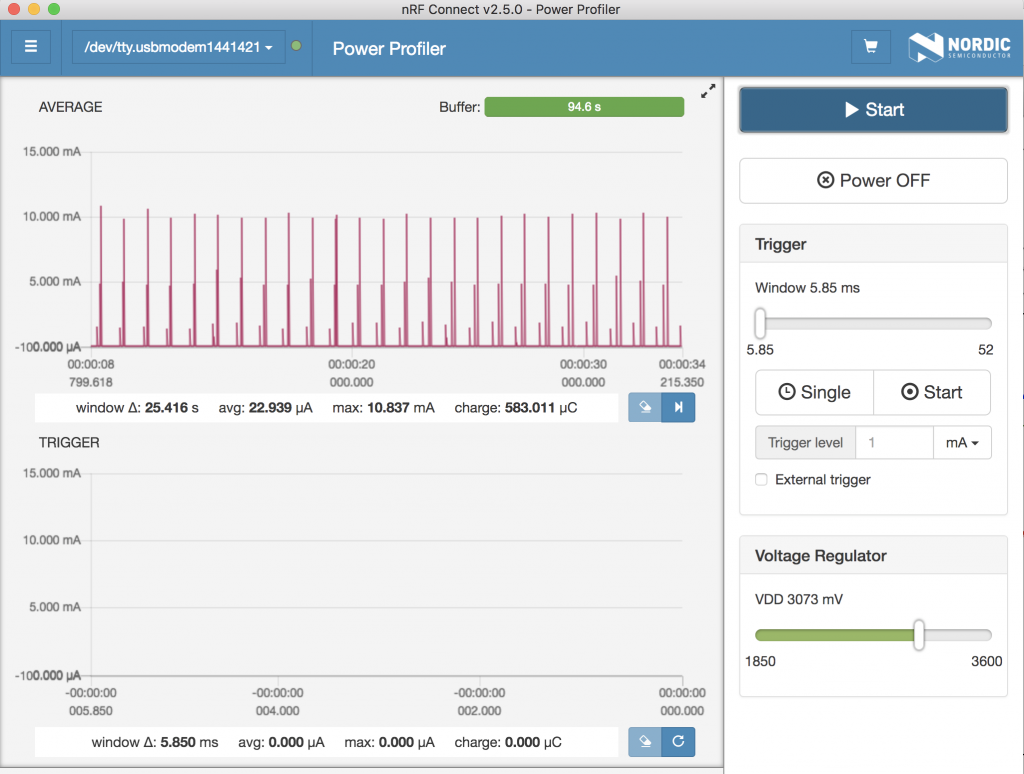
Power Profiling
This power profile is taken in radio-synchronized mode, i.e. without additional wakeup 2 ms after the measurement. Our last result was a bit under 23 μA, and it seems that this synchronizing hasn’t had effect on power consumption.
Bootloader Integration
Up until this point we have been using wired connection only. In the last part we created a bootloader for our project, let’s use it. As the Segger Embedded Studio (SES) project does not “understand” nrfutil and bootloader setting generation, we need to add a manual step for flashing the project created with SES to RuuviTag.
We create a script, “flash.sh” which will download the released bootloader and encryption key from Github and make a package which has softdevice, bootloader, bootloader configuration and application hex as well as a DFU package for the application.
#!/bin/bash
NAME="dev"
VERSION="0.0.1"
while getopts "n:v:" option;
do
case "${option}"
in
n) NAME=${OPTARG};;
v) VERSION=${OPTARG};;
esac
done

bootloader="ruuvitag_b_bootloader_3.0.0_s132_6.1.0_debug.hex"
if [ -f $bootloader ]; then
   echo "Found bootloader."
else
   wget https://github.com/ruuvi/ruuvi.nrf5_sdk15_bootloader.c/releases/download/3.0.0/ruuvitag_b_bootloader_3.0.0_s132_6.1.0_debug.hex
fi

key="ruuvi_open_private.pem"
if [ -f $key ]; then
   echo "Found key"
else
   wget https://github.com/ruuvi/ruuvi.nrf5_sdk15_bootloader.c/releases/download/3.0.0/ruuvi_open_private.pem
fi

nrfutil settings generate --family NRF52 --application Output/Debug/Exe/ruuvi.firmware.c.hex --application-version 1 --application-version-string "$VERSION" --bootloader-version 1 --bl-settings-version 1 settings.hex
mergehex -m ../../../../nRF5_SDK_15.2.0_9412b96/components/softdevice/s132/hex/s132_nrf52_6.1.0_softdevice.hex ruuvitag_b_bootloader_3.0.0_s132_6.1.0_debug.hex settings.hex -o sbc.hex
mergehex -m sbc.hex Output/Debug/Exe/ruuvi.firmware.c.hex -o packet.hex
nrfjprog --family nrf52 --eraseall
nrfjprog --family nrf52 --program packet.hex
nrfjprog --family nrf52 --reset

mv packet.hex ruuvitag_b\_ses\_$NAME\_$VERSION\_full.hex
cp Output/Debug/Exe/ruuvi.firmware.c.hex ruuvitag_b\_ses\_$NAME\_$VERSION\_app.hex
nrfutil pkg generate --application Output/Debug/Exe/ruuvi.firmware.c.hex --application-version 1 --application-version-string "$VERSION" --hw-version 0x0b --sd-req 0xA9 --key-file ruuvi_open_private.pem ruuvitag_b\_ses\_$NAME\_$VERSION\_dfu.zipThe script checks for given arguments -n and -v for name and version and defults to dev 0.0.1 if those are not given. The script then checks if the bootloader and the private key for signing the package are found and downloads them from Github if not.
Then the script creates bootloader settings and creates intermediate package sbc.hex which has the softdevice+bootloader with application settings configured. This package is then merged with the application to create a ready package for flashing the entire program to RuuviTag.
The RuuviTag is erased and full package is flashed in.
Finally the packages are given friendly names, for example running
./flash.sh -n ruuvifw -v 3.13.0gives us
- ruuvitag_b_ses_ruuvifw_3.13.0_full.hex
- ruuvitag_b_ses_ruuvifw_3.13.0_app.hex
- ruuvitag_b_ses_ruuvifw_3.13.0_dfu.zip
ARMGCC
Next we’ll create a packaging script for our ARMGCC builds so that our Jenkins can create similar packages. While we’re at it, we create support for batching builds in different modes by selecting which settings in application_config.h will be used by command line flag.
We add application_modes.h which will include headers with mode definitions if given mode is defined, and we add application_mode_longlife.h as an example.
#ifndef APPLICATION_MODES_H
#define APPLICATION_MODES_H
#ifdef APPLICATION_MODE_LONGLIFE
  #include "application_mode_longlife.h"
#endif

#endif/**
* Environmental sensor configuration
**/
// Sample rate is in Hz. This configures only the sensor, not transmission rate of data.
#define APPLICATION_ENVIRONMENTAL_CONFIGURED
#define APPLICATION_ENVIRONMENTAL_SAMPLERATE RUUVI_DRIVER_SENSOR_CFG_MIN
// Resolution and scale cannot be adjusted on BME280
#define APPLICATION_ENVIRONMENTAL_RESOLUTION RUUVI_DRIVER_SENSOR_CFG_DEFAULT
#define APPLICATION_ENVIRONMENTAL_SCALE RUUVI_DRIVER_SENSOR_CFG_DEFAULT
// Valid values for BME280 are: (RUUVI_DRIVER_SENSOR_DSP_)LAST, IIR, OS
// IIR slows step response but lowers noise
// OS increases power consumption but lowers noise.
// See https://blog.ruuvi.com/humidity-sensor-673c5b7636fc and https://blog.ruuvi.com/dsp-compromises-3f264a6b6344
#define APPLICATION_ENVIRONMENTAL_DSPFUNC RUUVI_DRIVER_SENSOR_DSP_IIR
// No effect on _LAST, use 1. On _OS and _IIR valid values are 2, 4, 8 and 16.
#define APPLICATION_ENVIRONMENTAL_DSPPARAM RUUVI_DRIVER_SENSOR_CFG_MAX
// (RUUVI_DRIVER_SENSOR_CFG_)SLEEP, SINGLE or CONTINUOUS
#define APPLICATION_ENVIRONMENTAL_MODE RUUVI_DRIVER_SENSOR_CFG_CONTINUOUS
/**
* Accelerometer configuration
**/
#define APPLICATION_ACCELERATION_CONFIGURED
// 1, 10, 25, 50, 100, 200 for LIS2DH12
#define APPLICATION_ACCELEROMETER_SAMPLERATE RUUVI_DRIVER_SENSOR_CFG_MIN
// 8, 10, 12 for LIS2DH12
#define APPLICATION_ACCELEROMETER_RESOLUTION 10
// 2, 4, 8, 16 for LIS2DH12
#define APPLICATION_ACCELEROMETER_SCALE RUUVI_DRIVER_SENSOR_CFG_MIN
// LAST or HIGH_PASS
#define APPLICATION_ACCELEROMETER_DSPFUNC RUUVI_DRIVER_SENSOR_DSP_LAST
#define APPLICATION_ACCELEROMETER_DSPPARAM 1
// SLEEP or CONTINUOUS
#define APPLICATION_ACCELEROMETER_MODE RUUVI_DRIVER_SENSOR_CFG_CONTINUOUS
/**
* Bluetooth configuration
*
*/
// Avoid "even" values such as 100 or 1000 to eventually drift apart from the devices transmitting at same interval
// Min 100, Max 10000
#define APPLICATION_ADVERTISING_CONFIGURED
#define APPLICATION_ADVERTISING_INTERVAL 9990
#define APPLICATION_ADVERTISING_POWER RUUVI_BOARD_TX_POWER_MAXOur main configuration file application_config.h has the definitions inside #ifdef-clauses and will #define default values unless something else is #defined.
Then we add the compile flag to our root makefile with
MODE=-DAPPLICATION_MODE_LONGLIFE.PHONY: all fw clean
all: fw
fw:
@echo build FW
git submodule update --init --recursive
$(MAKE) -C targets/ruuvitag_b/armgcc clean
$(MAKE) -C targets/ruuvitag_b/armgcc MODE=-DAPPLICATION_MODE_LONGLIFE
targets/ruuvitag_b/armgcc/package.sh -n ruuvifw_longlife
$(MAKE) -C targets/ruuvitag_b/armgcc clean
$(MAKE) -C targets/ruuvitag_b/armgcc
targets/ruuvitag_b/armgcc/package.sh -n ruuvifw_default
clean:
@echo cleaning build files…
$(MAKE) -C targets/ruuvitag_b/armgcc cleanOur ARMGCC makefile will append the mode argument to CFLAGS.
After the program has been built, our package script will create the packages for app, full and dfu -versions and name the version with github commit hash.
#!/bin/bash
cd "$(dirname "$0")"
NAME="ruuvifw"
VERSION=$(git rev-parse --short HEAD)
while getopts "n:v:" option;
do
case "${option}"
in
n) NAME=${OPTARG};;
v) VERSION=${OPTARG};;
esac
done

bootloader="ruuvitag_b_bootloader_3.0.0_s132_6.1.0_debug.hex"
if [ -f $bootloader ]; then
   echo "Found bootloader."
else
   wget https://github.com/ruuvi/ruuvi.nrf5_sdk15_bootloader.c/releases/download/3.0.0/ruuvitag_b_bootloader_3.0.0_s132_6.1.0_debug.hex
fi

key="ruuvi_open_private.pem"
if [ -f $key ]; then
   echo "Found key"
else
   wget https://github.com/ruuvi/ruuvi.nrf5_sdk15_bootloader.c/releases/download/3.0.0/ruuvi_open_private.pem
fi

nrfutil settings generate --family NRF52 --application _build/nrf52832_xxaa.hex --application-version 1  --bootloader-version 1 --bl-settings-version 1 settings.hex
mergehex -m ../../../../nRF5_SDK_15.2.0_9412b96/components/softdevice/s132/hex/s132_nrf52_6.1.0_softdevice.hex ruuvitag_b_bootloader_3.0.0_s132_6.1.0_debug.hex settings.hex -o sbc.hex
mergehex -m sbc.hex _build/nrf52832_xxaa.hex -o packet.hex

rm ruuvitag_b_armgcc*$NAME*.hex
rm ruuvitag_b_armgcc*$NAME*.zip

mv packet.hex ruuvitag_b\_armgcc\_$NAME\_$VERSION\_full.hex
cp _build/nrf52832_xxaa.hex ruuvitag_b\_armgcc\_$NAME\_$VERSION\_app.hex
nrfutil pkg generate --application _build/nrf52832_xxaa.hex --application-version 1 --hw-version 0x0b --sd-req 0xA9 --key-file ruuvi_open_private.pem ruuvitag_b\_armgcc\_$NAME\_$VERSION\_dfu.zipThis creates us
- ruuvitag_b_armgcc_ruuvifw_default_cf94d5d_app.hex
- ruuvitag_b_armgcc_ruuvifw_default_cf94d5d_dfu.zip
- ruuvitag_b_armgcc_ruuvifw_default_cf94d5d_full.hex
- ruuvitag_b_armgcc_ruuvifw_longlife_cf94d5d_app.hex
- ruuvitag_b_armgcc_ruuvifw_longlife_cf94d5d_dfu.zip
- ruuvitag_b_armgcc_ruuvifw_longlife_cf94d5d_full.hex
and removes any old binares. Then we configure Jenkis to store the build artifacts. Thanks Scrin for the suggestion!
Conclusion
We now have more precise battery measurement and a few ideas on how to improve estimates of remaining runtime. We have also added automatic builds of different variants, a time saver for everyone.
And finally, we now support bootloader on application and can update the applications without devkit.
Stay tuned and follow @ojousima and @ruuvicom on Twitter for #FirmwareFriday posts!