

This is the second part of the Ruuvi Firmware series which details how to build a sensor beacon software running on RuuviTag with Segger Embedded Studio. Final code of this blog post can be downloaded at Ruuvi GitHub in the ruuviblog-branch, tag 3.2.0-alpha. Please follow part 1 of the series for details on how to clone the repository and compile the code.
Filling in the blanks
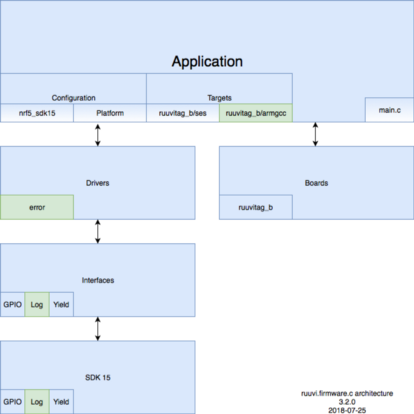
In the last part of the series, our codebase had already some stubs for returning status codes from the driver as well as compiling the project with ARMGCC without SES. Let’s fill in these sections of the code and add logging functionality.
Logging
Logging interface
Nordic SDK has excellent debug log macros, however passing arguments to macros through function calls is somewhat tricky. Therefore we’ll make some compromises and implement logging as function calls and call the macros in platform implementation.
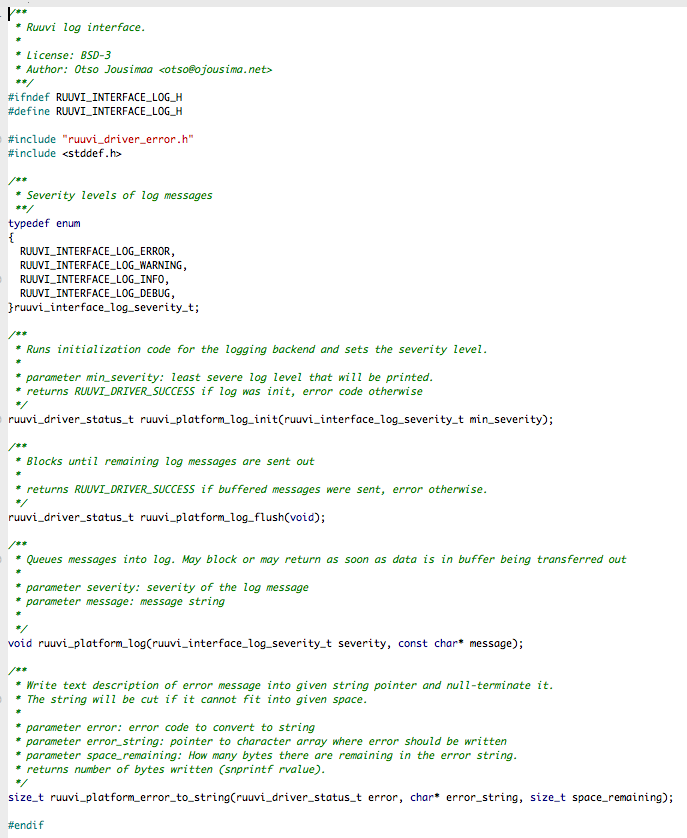
We’ll define four severity levels, Error, Warning, Info and Debug. Our init function takes the desired minimum severity as a parameter. We’ll also implement a flush which will write the logs off any buffers and an error code to string function which will give human-readable description to errors.
Logging implementation
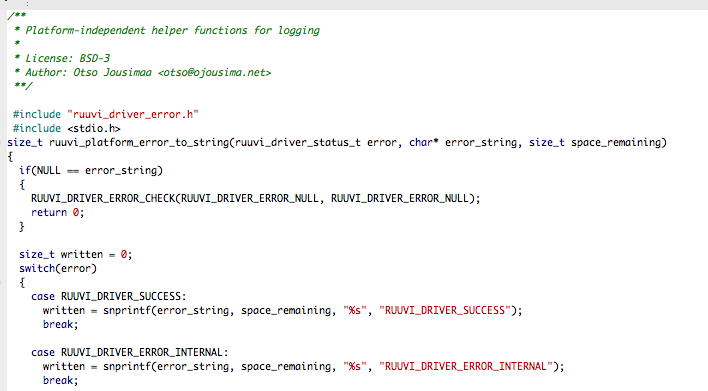
First we’ll fill in the platform-independent function ruuvi_platform_error_to_string. I consider the implementation to be rather inelegant, we have a fixed switch-case of ruuvi_driver_status_t labels and fill the values in. If someone can come up with an implementation that would read the labels from the enum definition and snprintf them to the pointer please let me know — or even better, open a pull request.
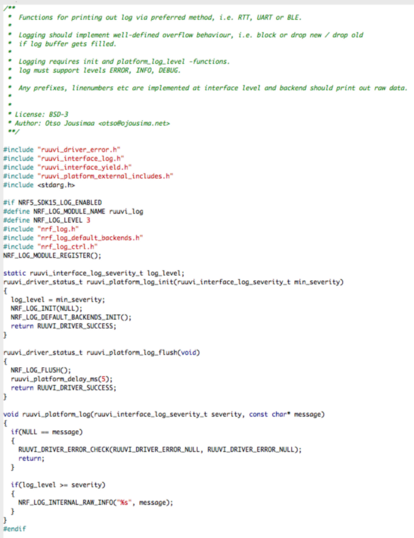
Second, we’ll dig into Nordic SDK implementation of the logging functions. Nordic SDK has a whole lot of macros which can fill in timestamps, file names, module names and provide great granularity to error reporting. To make things even better, they’re implemented as macros which will not get compiled in if logging is disabled.
Our implementation is a lot simpler, we’ll take in a function call and pass it on to Nordic macro. In theory, our compiler might notice that our ruuvi_platform_log function does not return anything and does not have side effects, which means that it could be optimized out as a NOP if we disable logging. In practise we’d get linking errors as our functions are functions rather than macros. Maybe we’ll implement later on a dummy logging backend which will be an empty function to allow disabling the logging.

Our logging function calls the Nordic RAW macro which won’t do any further prefixing or timestamping to the message. If the message was null for any reason we’ll print a warning and let the program flow continue.
Status codes
Error interface
We’ll want to catch errors as soon as possible, both during development and in production. Therefore we’ll be returning status from the functions and checking the status in program. We’ll also allow defining some errors as non-fatal: for example if environmental sensor is not found, we can accept the status and continue. However, if environmental sensor is found and does not pass self-test, we should consider the tag faulty and stop the program.
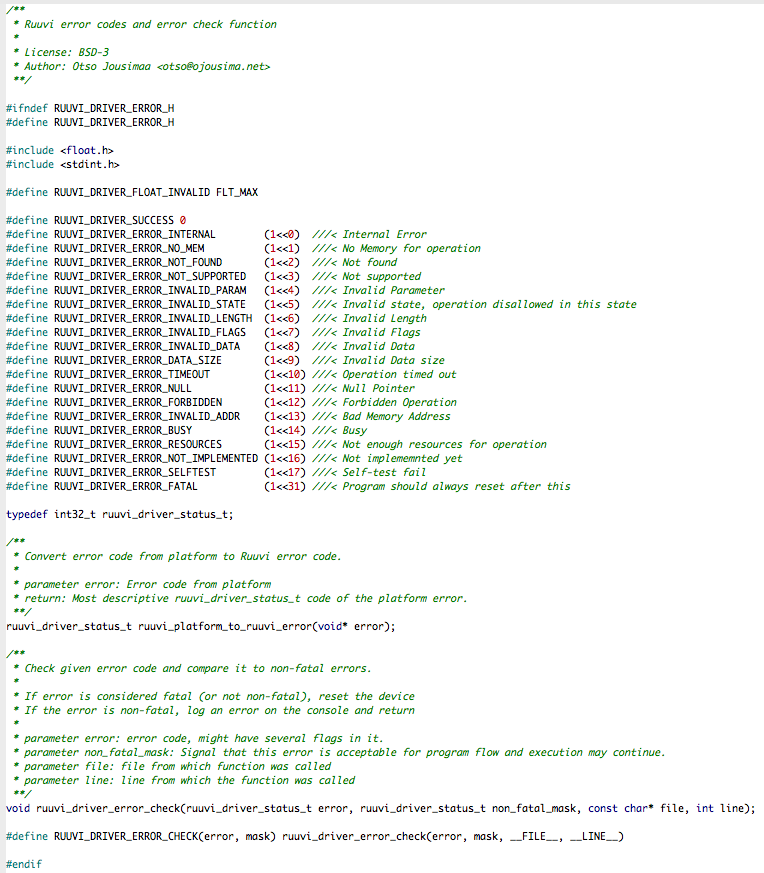
The error codes are defined as bit flags, and we’ll use int32_t rather than uint32_t as a container to give a special meaning fatal to the highest bit.
Error implementation
Error checking and converting has nothing complex in it. We’ll change the values from the Nordic SDK to Ruuvi values in conversion function. The error check function compares error-code to non-fatal mask, and if there was an error which is considered fatal we’ll log an error and reset. If there was a non-fatal error we’ll log warning and continue. If there was no error we’ll continue without logging anything.
Configuring the logs
As we’re using the Nordic backend, we’ll need to add some configuration to it. We’ll start by adding application configuration application_config.h and defining logging constants there. While we’re at it we’ll also add the GPIO and yield enables into our application configuration and refer to them in ruuvi_platform_nrf5_sdk15_config.h
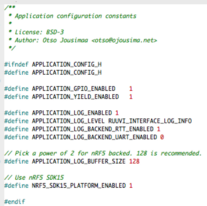
Then we’ll update the nrf5_sdk15_application_config.h. As the Nordic SDK expects the log buffer size to be at least 128 bytes and a power of 2, we’ll add a sanity check for the buffer size.

Adding logging and error checking to application
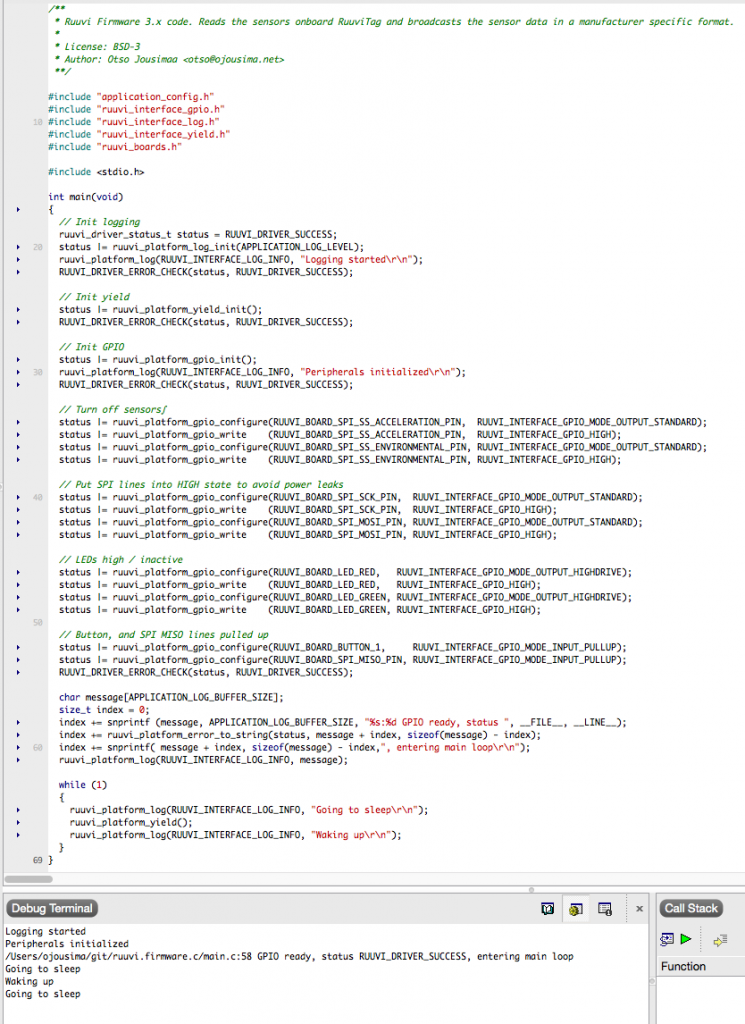
We’ll include the new code in our main application by collecting the status code from the initialization functions. Since our status code is a bit flag we can OR new errors to it as we go on in the program. We’ll also add some logging to demonstrate the log functions.
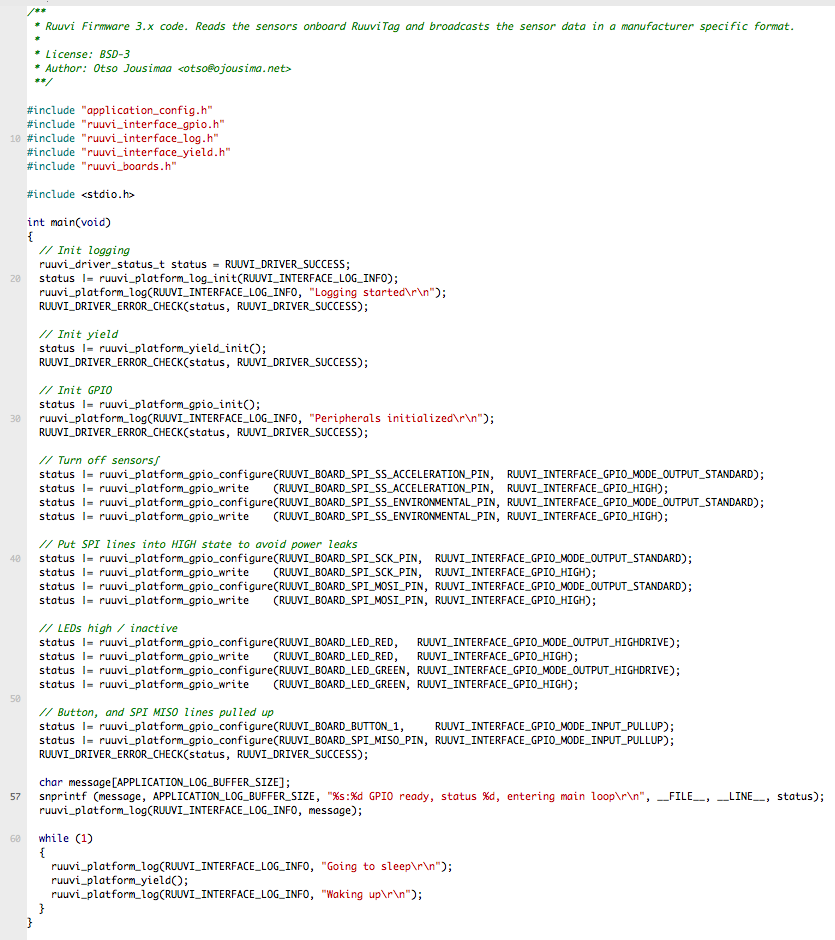
Line 57 demonstrates how to print runtime values in the log using snprintf. Let’s run the code and see what happens!

Good news is: Our error checking works as intended. The other good news is that we have found a bug in part 1 code — for some reason the yield initialization returns INVALID_STATE.
Digging deeper to find the source of error
Now we know that there is an error in our yield code, however we do not know what the error is or how it affects us. After all we had perfectly good sleep mode in the end of part 1. Our logging has pinpointed the error between lines 21 and 25 of main.c, and there is nothing else than the yield initialization there. Let us add a breakpoint to yield, and step in to the function.


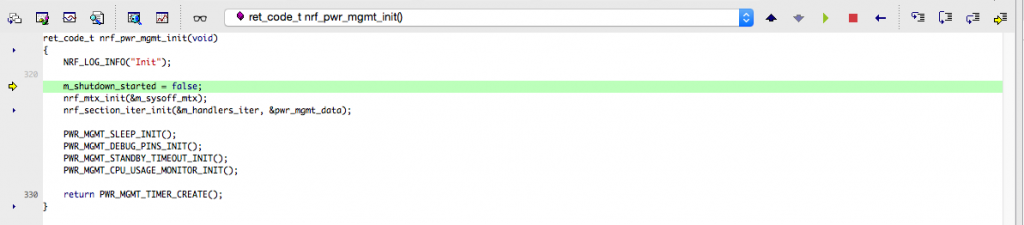
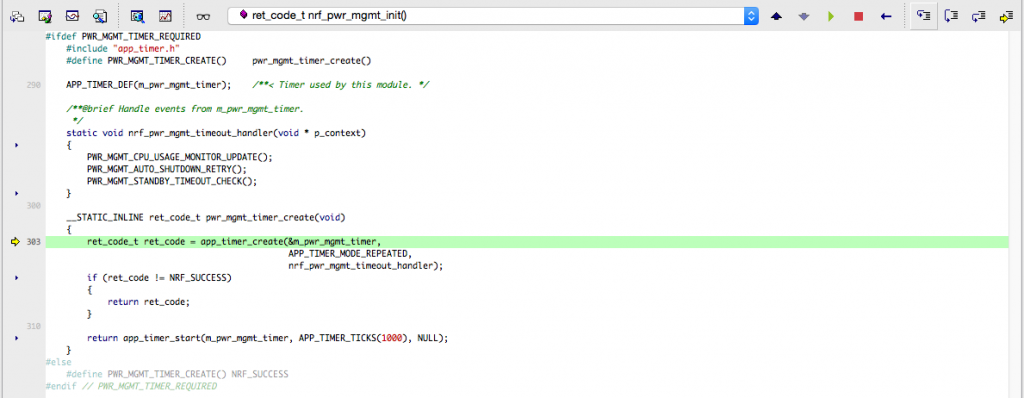
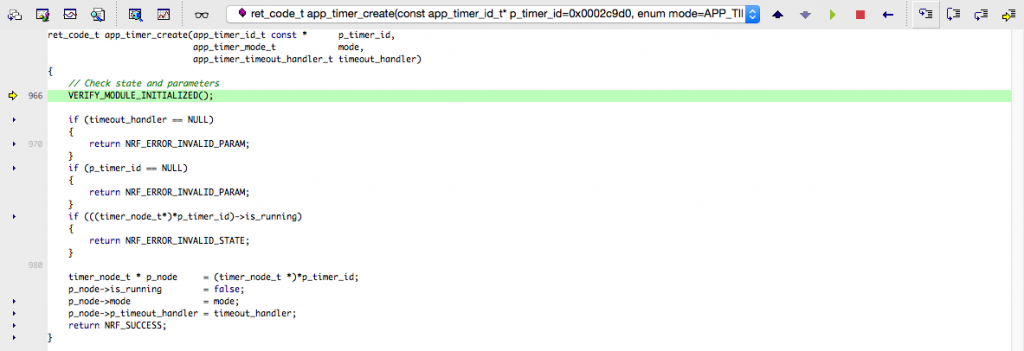
At this point we have located the error. Our yield initialization checks if we have initialized the timer module, and we have not done that. Why does our sleep need timers? Let us return to nrf_pwr_mgmt.c to find out.
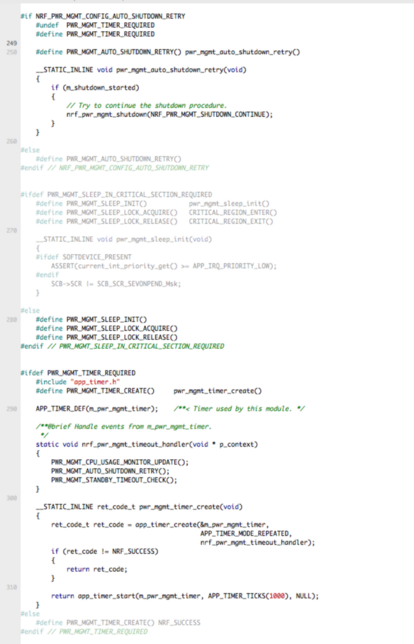
A few lines before the error we’ll see that we have a check for NRF_PWR_MGMT_CONFIG_AUTO_SHUTDOWN_RETRY which defines the PWR_MGMT_TIMER_REQUIRED. We don’t have a need for any kind of automatic shutdown retries at this point, so we’ll unconfigure it in nrf5_sdk15_application_config.h. Now we’re ready for another try with our application.
Now we’re closer to what one might expect. Our initialization ends in RUUVI_DRIVER_SUCCESS and tag goes to sleep. Curiously, we’ll wake up once and then go to sleep again. Maybe we’re having interrupt when log printing finishes?
Finishing touches
Power consumption
As always, the power consumption is the driving factor in our code. There is a good chance that we’re consuming something extra after enabling the logging peripherals, so let us verify the final power consumption.
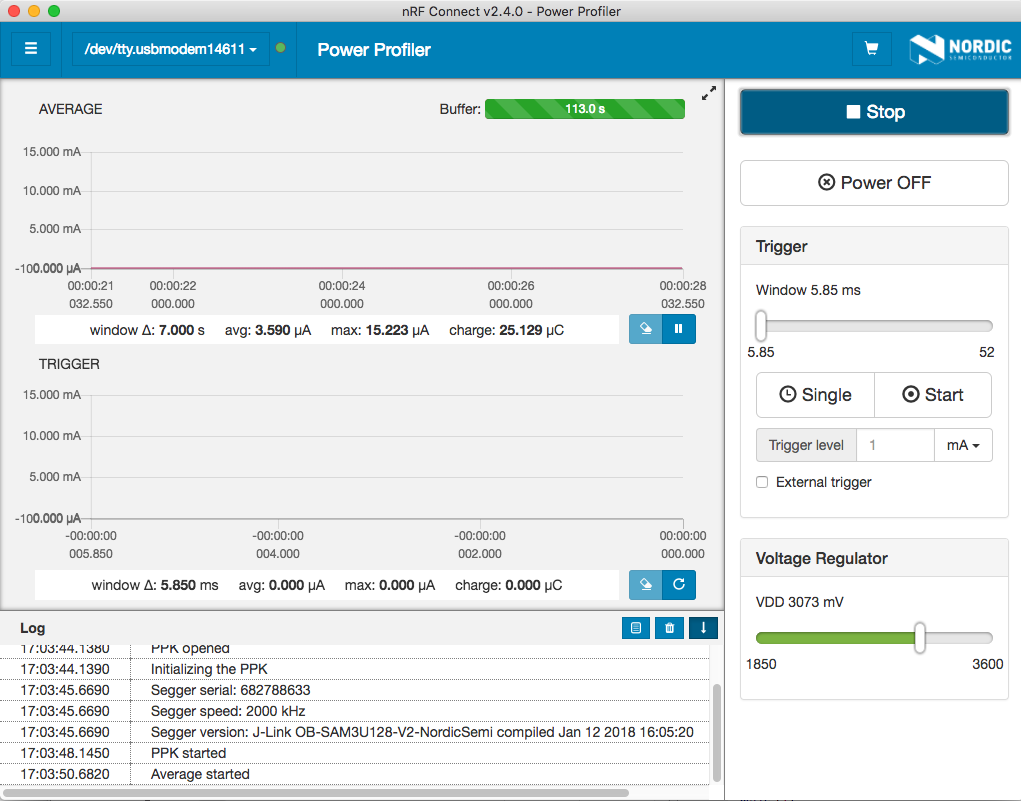
In the previous part we concluded that our power consumption was 4.0 μA, so it would seem that we’re having a 10 % improvement for no apparent reason. Personally I’m guessing that the difference is caused by the ambient temperature — last week we had a heatwave in Finland whereas the current temperature is much cooler. Nothing in the power profile gives us cause for alarm, as we’re not consuming any more than we used to.
ARMGCC & Jenkins.
We’ll also setup ARMGCC target for continuous integration with Jenkins. After following this video tutorial we’ll need to install ARMGCC 6-2017-q2-update to /usr/local of our jenkins server, download and unzip nRF5 SDK15 to /var/lib/jenkins/workspace/.
Now whenever I push the code to my personal branch the code will get pulled from the GitHub and compiled. This ensures that everyone has access to a working version with all submodules up to date. It also lets everyone to see the build status in README at a glance. Finally, we’ll store the compiled .hex file made by ARMGCC and let anyone to download it from http://jenkins.ruuvi.com/job/ruuvi.firmware.c/.
If you prefer to use ARMGCC instead of SES you can now run “make” on the root of the project to compile the project assuming that you have the build environment set up.
Conclusion
After this tutorial we have implemented some basic automated and manual quality control for our project. Our drivers return error codes which are checked and logged if there are any abnormalities and we’ll compile the code pushed to GitHub and store the resulting outputs. You should note that ARMGCC and SES use different linker scripts, which means that the resulting hexes are not necessarily functionally identical. Maybe we’ll improve on this in future automated testing.
In meanwhile, stay tuned and follow @ojousima and @ruuvicom on Twitter for #FirmwareFriday posts!