Ruuvi widgets allow you to conveniently access your Ruuvi sensor data directly from your smartphone’s home screen, making it easier than ever to monitor your environment. This support article will guide you through the process of adding and customizing Ruuvi widgets on your device.
New Feature! Ruuvi Station Android now supports Bluetooth sensors in widgets. This means you can add widgets to monitor your local Ruuvi sensors directly via your phone’s Bluetooth connection.
Important: To use widgets over the internet, data is retrieved from the Ruuvi Cloud Service. A Ruuvi Gateway Router is required for accessing widgets linked to your Ruuvi Cloud sensors. Local Bluetooth sensor data is accessible only when you’re near your Ruuvi sensors.
Widgets are only available for Ruuvi Station mobile.
Step 1: Install the Ruuvi Station app
Before using Ruuvi widgets, ensure you have the Ruuvi Station app installed on your smartphone. The app is available for both Android and iOS devices and can be downloaded from the Google Play Store or the Apple App Store.
Step 2.1 (for updating sensor data to widgets with local Bluetooth connection, Android only):
Add your local Ruuvi sensors to Ruuvi Station Android app. Notice that you need to be in close proximity to update measurement data from local sensors via your mobile Bluetooth connection.
Step 2.2 (for updating sensor data to widgets from Ruuvi Cloud):
Add your Ruuvi sensors, sign in to Ruuvi Station and claim your sensors.
To display sensor data from the Cloud on your widgets, you must first add your Ruuvi sensors to the Ruuvi Station app, then sign in to the app and claim sensor ownership, if you already haven’t.
First, add your sensors:
Ensure your Bluetooth is enabled.
Bring your Ruuvi sensor within range of your smartphone.
Open the Ruuvi Station app and go to Add a New Sensor page.
The app should automatically discover and list your sensor under Nearby Ruuvi Sensors.
Add your sensor to Ruuvi Station app by tapping on the sensor name in the list.
Alternatively, you can use NFC to add sensors to Ruuvi Station (if your device supports NFC).
Next, sign in to Ruuvi Station:
Go to main menu and choose My Ruuvi Account.
Tap on sign in and enter your email address.
A sign in code will be sent to your email address, enter the code as requested.
Finally, claim your sensors to your Ruuvi account:
Go to Sensor Settings by choosing Sensor Settings & Alerts in 3 dot menu (dashboard) or tap on the cogwheel icon on Sensor Card (full image view).
On the Sensor Settings page, see Owner under General.
Tap on the Owner field to access the Claim Sensor page.
Tap Claim Ownership button to assign ownership of the sensor to the account with which you are signed into Ruuvi Station.
You will be forwarded back to the Sensor Settings page and your email address will appear under Owner.
Step 3: Add a Ruuvi widget to your home screen
Adding a widget to your home screen varies depending on your device and operating system. Here are the general steps for both Android and iOS:
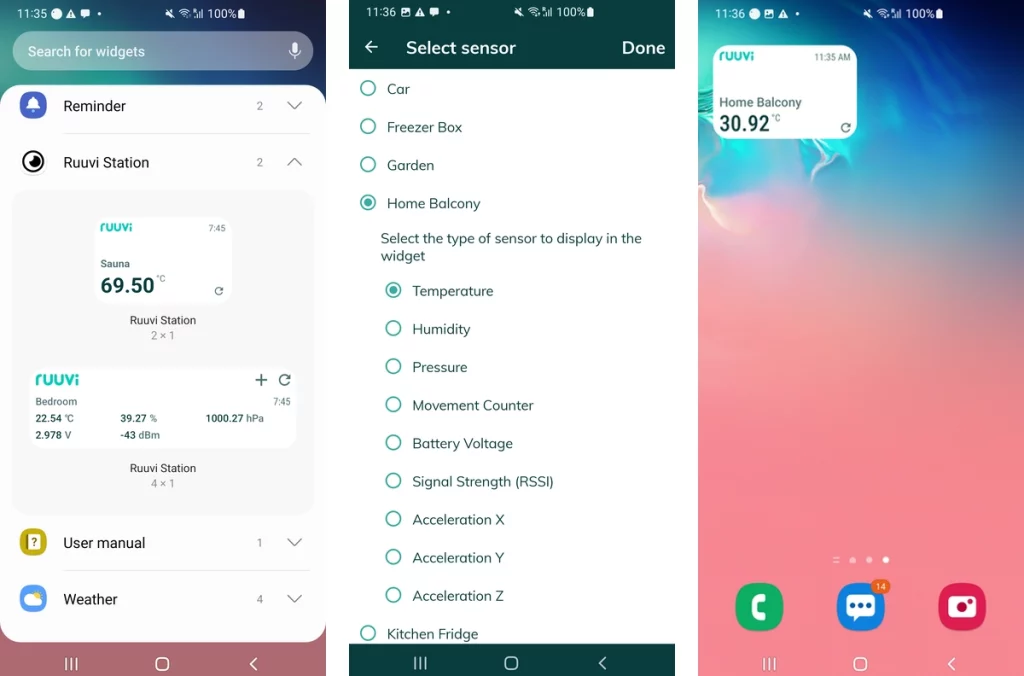
Ruuvi Widgets For Android:
Tap and hold an empty space on your home screen.
Select “Widgets” from the menu that appears.
Scroll through the list of available widgets and find “Ruuvi Station.”
Tap and hold the type of widget you wish to add, then drag it to your desired location on the home screen.
Ruuvi Widgets For iOS:
Swipe to the right on your home screen to access the “Today View.”
Scroll to the bottom and tap “Edit.”
Find “Ruuvi Station” in the list of available widgets.
Tap the “+” icon to add the widget, then tap “Done.”
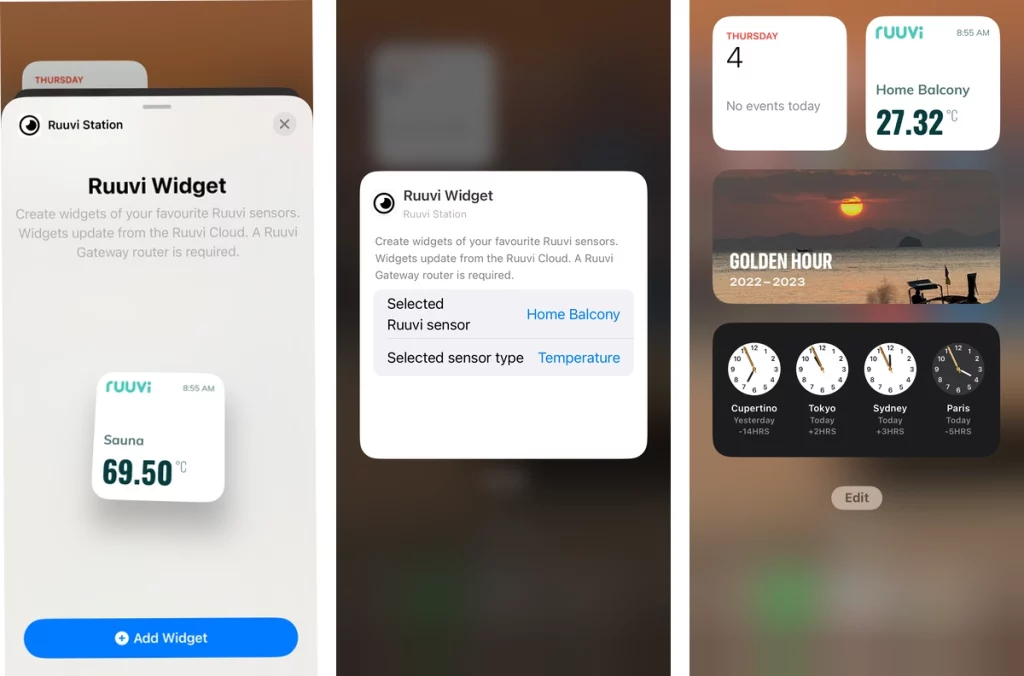
Step 4: Configure your Ruuvi widget
Once you’ve added the Ruuvi widget to your home screen, you can customize its settings to display the sensor data you’re interested in:
Tap and hold the Ruuvi widget on your home screen.
Select “Configure” or “Edit Widget” from the menu that appears.
Choose the RuuviTag sensor you want the widget to display data from.
Select the specific measurement you want to display (e.g., temperature, humidity, air pressure). On Android you will be able to choose a widget type that is able to display multiple measurements at once.
Save your settings.
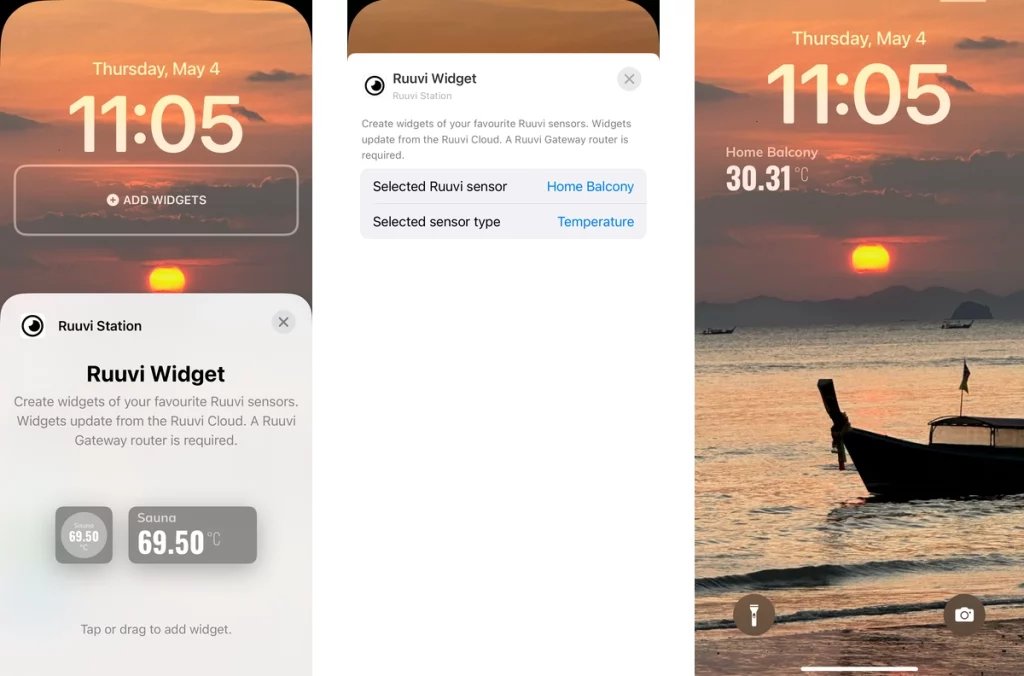
Step 5: Add Ruuvi widget to iOS lock screen and configure it (iOS only)
Additionally, you will be able to add Ruuvi widget to your lock screen on iOS version 16 and above.
First, add lock screen widget:
Swipe down on home screen to bring lock screen into view.
Long tap on screen to go to Customize screen, tap on Customize button at bottom of page.
Choose Lock Screen and tap on Add Widgets button.
Scroll through the list of available widgets and find “Ruuvi Station.”
Select widget type by tap or drag to add widget.
Then, configure the widget:
Edit widget by double-tapping on widget.
Choose the RuuviTag sensor you want the widget to display data from.
Select the specific sensor you want to display (e.g., temperature, humidity, air pressure).
Save your settings.
Conclusion
Widgets offer a convenient way to access your Ruuvi sensor data directly from your smartphone’s home screen. By following these steps, you can easily add and customize Ruuvi widgets to display the environmental data most relevant to your needs. Keep an eye on your sensor data with just a glance, and stay informed about your environment at all times.